使用Gemma 3和Doclin構建多模態RAG管道

使用Gemma 3和Doclin構建多模態RAG管道

在本教學中,我們將探討如何在 Google Colab 中建立並執行復雜的檢索增強生成(RAG)管道。我們利用多種最先進的工具和庫,包括用於語言和視覺任務的 Gemma 3、用於文件轉換的 Docling、用於思維鏈協調的 LangChain 以及作為向量資料庫的 Milvus,構建了一個能夠理解和處理文字、表格和影像的多模態系統。讓我們深入瞭解每個元件,看看它們是如何協同工作的

什麼是多模態RAG

多模態 RAG(Retrieval-Augmented Generation,檢索增強生成)透過整合多種資料模態(本例中為文字、表格和影像),擴充套件了傳統的基於文字的 RAG 系統。這意味著管道不僅能處理和檢索文字,還能利用視覺模型來理解和描述影像內容,從而使解決方案更加全面。這種多模態方法尤其適用於像年度報告這樣經常包含圖表等視覺元素的文件。

使用Gemma的多模態RAG擬議架構

多模態RAG擬議架構

該專案的目標是建立一個強大的多模態 RAG 管道,該管道可以攝取文件(如 PDF)、處理文字和影像、將文件嵌入儲存到向量資料庫中,並透過檢索相關資訊來回答查詢。這種設定對於分析年度報告、提取財務報表或總結技術論文等應用特別有用。透過整合各種庫和工具,我們將語言模型的強大功能與文件轉換和向量搜尋結合起來,建立了一個全面的端到端解決方案。

庫和工具概述

該管道使用了幾個關鍵庫和工具:

  • Colab-Xterm 擴充套件庫:它在 Colab 中增加了終端支援,使我們能夠執行 shell 命令並有效管理環境。
  • Ollama 模型:提供 Gemma3 等預訓練模型,用於語言和視覺任務。
  • Transformers:來自 Hugging Face,用於模型載入和標記化。
  • LangChain:協調從提示建立到文件檢索和生成的一連串處理步驟。
  • Docling:將 PDF 文件轉換為結構化格式,可提取文字、表格和影像。
  • Milvus:向量資料庫,用於儲存文件嵌入並支援高效的相似性搜尋。
  • Hugging Face CLI:用於登入 Hugging Face 訪問某些模型。
  • 其他實用工具:如用於影像處理的 Pillow 和用於顯示功能的 IPython。

使用Gemma 3構建多模態RAG

我們正在構建多模態 RAG:這種方法提高了上下文理解、準確性和相關性,尤其是在醫療保健、研究和媒體分析等領域。透過利用跨模態嵌入、混合檢索策略和視覺語言模型,多模態 RAG 系統可以提供更豐富、更有洞察力的響應。關鍵的挑戰在於如何有效地整合和檢索多模態資料,同時保持一致性和可擴充套件性。隨著人工智慧的發展,開發最佳化的架構和檢索策略對於釋放多模態智慧的全部潛力至關重要。

使用Colab-Xterm進行終端設定

首先,我們安裝 colab-xterm 擴充套件,將終端環境直接引入 Colab。這樣,我們就可以執行系統命令、安裝軟體包,並更靈活地管理會話。

Plain text
Copy to clipboard
Open code in new window
EnlighterJS 3 Syntax Highlighter
!pip install colab-xterm # Install colab-xterm
%load_ext colabxterm # Load the xterm extension
%xterm # Launch an xterm terminal session in Colab
!pip install colab-xterm # Install colab-xterm %load_ext colabxterm # Load the xterm extension %xterm # Launch an xterm terminal session in Colab
!pip install colab-xterm  # Install colab-xterm
%load_ext colabxterm     # Load the xterm extension
%xterm                  # Launch an xterm terminal session in Colab

使用Colab-Xterm進行終端設定

這種終端支援對於安裝額外的依賴項或管理後臺程序特別有用。

安裝和管理Ollama模型

我們可以使用簡單的 shell 命令將特定的 Ollama 模型調入我們的環境。例如

Plain text
Copy to clipboard
Open code in new window
EnlighterJS 3 Syntax Highlighter
!ollama pull gemma3:4b
!ollama pull llama3.2
!ollama list
!ollama pull gemma3:4b !ollama pull llama3.2 !ollama list
!ollama pull gemma3:4b
!ollama pull llama3.2
!ollama list

這些命令確保我們有必要的語言和視覺模型可用,例如強大的 Gemma 3 模型,它是我們多模態處理的核心。

安裝基本Python軟體包

下一步是安裝我們的管道所需的大量軟體包。這包括深度學習、文字處理和文件處理庫:

Plain text
Copy to clipboard
Open code in new window
EnlighterJS 3 Syntax Highlighter
! pip install transformers pillow langchain_community langchain_huggingface langchain_milvus docling langchain_ollama

透過安裝這些軟體包,我們可以為從檔案轉換到檢索增強生成等一切工作準備好環境。

日誌記錄和Hugging Face驗證

設定日誌對於監控管道執行至關重要:

Plain text
Copy to clipboard
Open code in new window
EnlighterJS 3 Syntax Highlighter
import logging
logging.basicConfig(level=logging.INFO)
import logging logging.basicConfig(level=logging.INFO)
import logging
logging.basicConfig(level=logging.INFO)

我們還使用其 CLI 登入 Hugging Face,以訪問某些預訓練模型:

Plain text
Copy to clipboard
Open code in new window
EnlighterJS 3 Syntax Highlighter
!huggingface-cli login

這一認證步驟對於獲取模型工件和確保與 Hugging Face 生態系統的順利整合十分必要。

配置視覺和語言模型(Gemma 3)

該管道利用 Gemma 3 模型完成視覺和語言任務。在語言方面,我們設定了模型和標記器:

這種雙重設定能讓系統從影像中生成文字描述,使管道真正實現多模態。

使用Docling進行文件轉換

1. 將PDF轉換為結構化文件

我們使用 Docling 的 DocumentConverter 將 PDF 轉換為結構化文件。轉換過程包括從源 PDF 中提取文字、表格和影像:

Plain text
Copy to clipboard
Open code in new window
EnlighterJS 3 Syntax Highlighter
from docling.document_converter import DocumentConverter, PdfFormatOption
from docling.datamodel.base_models import InputFormat
from docling.datamodel.pipeline_options import PdfPipelineOptions
pdf_pipeline_options = PdfPipelineOptions(
do_ocr=False,
generate_picture_images=True,
)
format_options = { InputFormat.PDF: PdfFormatOption(pipeline_options=pdf_pipeline_options) }
converter = DocumentConverter(format_options=format_options)
# Define the sources (URLs) of the documents to be converted.
# "https://arxiv.org/pdf/1706.03762"
sources = [
"https://www.pwc.com/jm/en/research-publications/pdf/basic-understanding-of-a-companys-financials.pdf"
]
# Convert the PDF documents from the sources into an internal document format.
conversions = { source: converter.convert(source=source).document for source in sources }
from docling.document_converter import DocumentConverter, PdfFormatOption from docling.datamodel.base_models import InputFormat from docling.datamodel.pipeline_options import PdfPipelineOptions pdf_pipeline_options = PdfPipelineOptions( do_ocr=False, generate_picture_images=True, ) format_options = { InputFormat.PDF: PdfFormatOption(pipeline_options=pdf_pipeline_options) } converter = DocumentConverter(format_options=format_options) # Define the sources (URLs) of the documents to be converted. # "https://arxiv.org/pdf/1706.03762" sources = [ "https://www.pwc.com/jm/en/research-publications/pdf/basic-understanding-of-a-companys-financials.pdf" ] # Convert the PDF documents from the sources into an internal document format. conversions = { source: converter.convert(source=source).document for source in sources }
from docling.document_converter import DocumentConverter, PdfFormatOption
from docling.datamodel.base_models import InputFormat
from docling.datamodel.pipeline_options import PdfPipelineOptions
pdf_pipeline_options = PdfPipelineOptions(
    do_ocr=False,
    generate_picture_images=True,
)
format_options = { InputFormat.PDF: PdfFormatOption(pipeline_options=pdf_pipeline_options) }
converter = DocumentConverter(format_options=format_options)
# Define the sources (URLs) of the documents to be converted.
# "https://arxiv.org/pdf/1706.03762"
sources = [
 "https://www.pwc.com/jm/en/research-publications/pdf/basic-understanding-of-a-companys-financials.pdf"
]
# Convert the PDF documents from the sources into an internal document format.
conversions = { source: converter.convert(source=source).document for source in sources }

輸出檔案

PWC

Source – Link

我們將使用普華永道公開的財務報表。我附上了 PDF 連結,也歡迎大家新增自己的源連結!

2. 提取和分割內容

轉換後,我們將文件分成易於管理的部分,將文字與表格和圖片分開。透過這種分割,可以對每個部分進行獨立處理:

Plain text
Copy to clipboard
Open code in new window
EnlighterJS 3 Syntax Highlighter
from docling_core.transforms.chunker.hybrid_chunker import HybridChunker
from langchain_core.documents import Document
# Process text chunks (excluding pure table segments)
texts: list[Document] = []
for source, docling_document in conversions.items():
for chunk in HybridChunker(tokenizer=embeddings_tokenizer).chunk(docling_document):
# Skip table-only chunks; process tables separately
if len(chunk.meta.doc_items) == 1:
continue
document = Document(
page_content=chunk.text,
metadata={"source": source, "ref": "reference details"}
)
texts.append(document)
from docling_core.transforms.chunker.hybrid_chunker import HybridChunker from langchain_core.documents import Document # Process text chunks (excluding pure table segments) texts: list[Document] = [] for source, docling_document in conversions.items(): for chunk in HybridChunker(tokenizer=embeddings_tokenizer).chunk(docling_document): # Skip table-only chunks; process tables separately if len(chunk.meta.doc_items) == 1: continue document = Document( page_content=chunk.text, metadata={"source": source, "ref": "reference details"} ) texts.append(document)
from docling_core.transforms.chunker.hybrid_chunker import HybridChunker
from langchain_core.documents import Document
# Process text chunks (excluding pure table segments)
texts: list[Document] = []
for source, docling_document in conversions.items():
    for chunk in HybridChunker(tokenizer=embeddings_tokenizer).chunk(docling_document):
        # Skip table-only chunks; process tables separately
        if len(chunk.meta.doc_items) == 1:
            continue
        document = Document(
            page_content=chunk.text,
            metadata={"source": source, "ref": "reference details"}
        )
        texts.append(document)

這種方法不僅能提高處理效率,還有助於日後進行更精確的向量儲存和檢索。

影像處理和編碼

我們使用 Pillow 處理文件中的影像。我們將影像轉換為 base64 編碼字串,這些字串可直接嵌入到提示中:

Plain text
Copy to clipboard
Open code in new window
EnlighterJS 3 Syntax Highlighter
import base64, io, PIL.Image, PIL.ImageOps
def encode_image(image: PIL.Image.Image, format: str = "png") -> str:
image = PIL.ImageOps.exif_transpose(image) or image
image = image.convert("RGB")
buffer = io.BytesIO()
image.save(buffer, format)
encoding = base64.b64encode(buffer.getvalue()).decode("utf-8")
return f"data:image/{format};base64,{encoding}"
import base64, io, PIL.Image, PIL.ImageOps def encode_image(image: PIL.Image.Image, format: str = "png") -> str: image = PIL.ImageOps.exif_transpose(image) or image image = image.convert("RGB") buffer = io.BytesIO() image.save(buffer, format) encoding = base64.b64encode(buffer.getvalue()).decode("utf-8") return f"data:image/{format};base64,{encoding}"
import base64, io, PIL.Image, PIL.ImageOps
def encode_image(image: PIL.Image.Image, format: str = "png") -> str:
    image = PIL.ImageOps.exif_transpose(image) or image
    image = image.convert("RGB")
    buffer = io.BytesIO()
    image.save(buffer, format)
    encoding = base64.b64encode(buffer.getvalue()).decode("utf-8")
    return f"data:image/{format};base64,{encoding}"

隨後,這些影像會被輸入我們的視覺模型,生成描述性文字,從而增強我們管道的多模態能力。

利用Milvus建立向量資料庫

為了快速準確地檢索文件嵌入,我們將 Milvus 設定為向量儲存庫:

Plain text
Copy to clipboard
Open code in new window
EnlighterJS 3 Syntax Highlighter
import tempfile
from langchain_core.vectorstores import VectorStore
from langchain_milvus import Milvus
db_file = tempfile.NamedTemporaryFile(prefix="vectorstore_", suffix=".db", delete=False).name
vector_db: VectorStore = Milvus(
embedding_function=embeddings_model,
connection_args={"uri": db_file},
auto_id=True,
enable_dynamic_field=True,
index_params={"index_type": "AUTOINDEX"},
)
import tempfile from langchain_core.vectorstores import VectorStore from langchain_milvus import Milvus db_file = tempfile.NamedTemporaryFile(prefix="vectorstore_", suffix=".db", delete=False).name vector_db: VectorStore = Milvus( embedding_function=embeddings_model, connection_args={"uri": db_file}, auto_id=True, enable_dynamic_field=True, index_params={"index_type": "AUTOINDEX"}, )
import tempfile
from langchain_core.vectorstores import VectorStore
from langchain_milvus import Milvus
db_file = tempfile.NamedTemporaryFile(prefix="vectorstore_", suffix=".db", delete=False).name
vector_db: VectorStore = Milvus(
    embedding_function=embeddings_model,
    connection_args={"uri": db_file},
    auto_id=True,
    enable_dynamic_field=True,
    index_params={"index_type": "AUTOINDEX"},
)

然後,文件–無論是文字、表格還是影像描述–都會被新增到向量資料庫中,從而在執行查詢時實現快速、準確的相似性搜尋。

構建檢索增強生成(RAG)鏈

1. 提示建立和文件包裝

使用 LangChain 的提示模板,我們可以建立自定義提示,將上下文和查詢輸入我們的語言模型:

Plain text
Copy to clipboard
Open code in new window
EnlighterJS 3 Syntax Highlighter
from langchain.prompts import PromptTemplate
prompt = "{input} Given the context: {context}"
prompt_template = PromptTemplate.from_template(template=prompt)
from langchain.prompts import PromptTemplate prompt = "{input} Given the context: {context}" prompt_template = PromptTemplate.from_template(template=prompt)
from langchain.prompts import PromptTemplate
prompt = "{input} Given the context: {context}"
prompt_template = PromptTemplate.from_template(template=prompt)

每個檢索到的文件都使用文件提示模板進行包裝,確保模型能夠理解輸入上下文的結構。

2. 組裝RAG管道

我們將提示與向量儲存相結合,建立一個檢索鏈,首先獲取相關文件,然後利用它們生成一個連貫的答案:

Plain text
Copy to clipboard
Open code in new window
EnlighterJS 3 Syntax Highlighter
from langchain.chains.retrieval import create_retrieval_chain
from langchain.chains.combine_documents import create_stuff_documents_chain
combine_docs_chain = create_stuff_documents_chain(
llm=model,
prompt=prompt_template,
document_prompt=PromptTemplate.from_template(template="""\
Document {doc_id}
{page_content}"""),
document_separator="\n\n",
)
rag_chain = create_retrieval_chain(
retriever=vector_db.as_retriever(),
combine_docs_chain=combine_docs_chain,
)
from langchain.chains.retrieval import create_retrieval_chain from langchain.chains.combine_documents import create_stuff_documents_chain combine_docs_chain = create_stuff_documents_chain( llm=model, prompt=prompt_template, document_prompt=PromptTemplate.from_template(template="""\ Document {doc_id} {page_content}"""), document_separator="\n\n", ) rag_chain = create_retrieval_chain( retriever=vector_db.as_retriever(), combine_docs_chain=combine_docs_chain, )
from langchain.chains.retrieval import create_retrieval_chain
from langchain.chains.combine_documents import create_stuff_documents_chain
combine_docs_chain = create_stuff_documents_chain(
    llm=model,
    prompt=prompt_template,
    document_prompt=PromptTemplate.from_template(template="""\
Document {doc_id}
{page_content}"""),
    document_separator="\n\n",
)
rag_chain = create_retrieval_chain(
    retriever=vector_db.as_retriever(),
    combine_docs_chain=combine_docs_chain,
)

然後根據該鏈執行查詢,檢索上下文,並根據查詢和儲存的文件嵌入生成響應。

執行查詢和檢索資訊

一旦建立了 RAG 鏈,就可以執行查詢,從文件資料庫中檢索相關資訊。例如

Plain text
Copy to clipboard
Open code in new window
EnlighterJS 3 Syntax Highlighter
query = "Explain Three Key Financial Statements Notes"
outputs = rag_chain.invoke({"input": query})
Markdown(outputs['answer'])
query = "Explain Three Key Financial Statements Notes" outputs = rag_chain.invoke({"input": query}) Markdown(outputs['answer'])
query = "Explain Three Key Financial Statements Notes"
outputs = rag_chain.invoke({"input": query})
Markdown(outputs['answer'])

從文件資料庫中檢索相關資訊-01

Plain text
Copy to clipboard
Open code in new window
EnlighterJS 3 Syntax Highlighter
query = "tell me the Contents of an annual report"
outputs = rag_chain.invoke({"input": query})
Markdown(outputs['answer'])
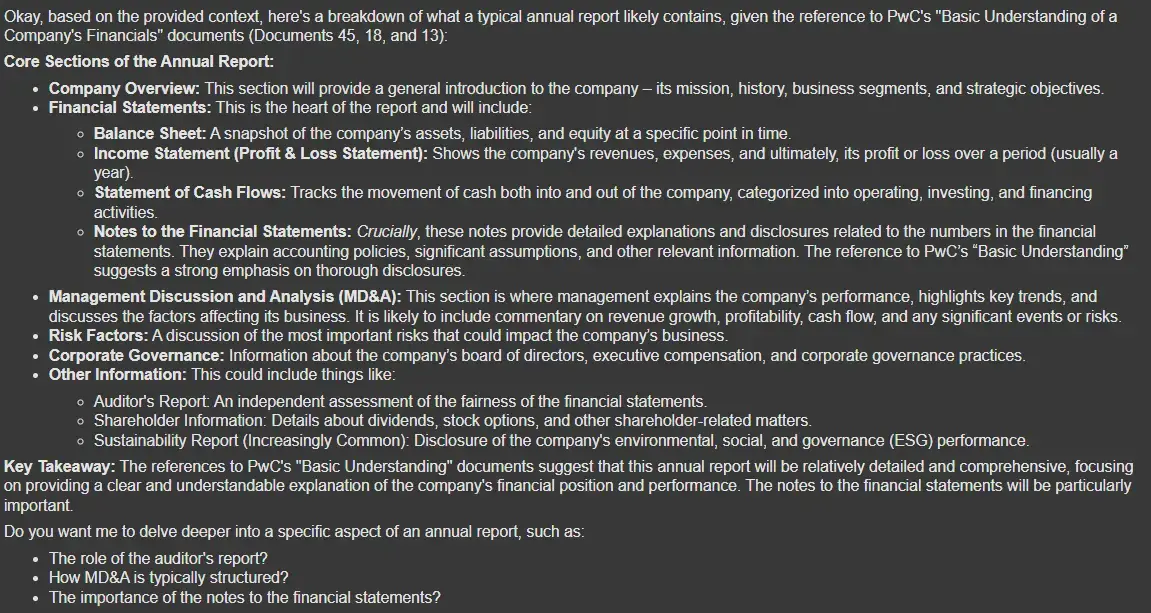
query = "tell me the Contents of an annual report" outputs = rag_chain.invoke({"input": query}) Markdown(outputs['answer'])
query = "tell me the Contents of an annual report"
outputs = rag_chain.invoke({"input": query})
Markdown(outputs['answer'])

從文件資料庫中檢索相關資訊-02

Plain text
Copy to clipboard
Open code in new window
EnlighterJS 3 Syntax Highlighter
query = "what are the benefits of an annual report?"
outputs = rag_chain.invoke({"input": query})
Markdown(outputs['answer'])
query = "what are the benefits of an annual report?" outputs = rag_chain.invoke({"input": query}) Markdown(outputs['answer'])
query = "what are the benefits of an annual report?"
outputs = rag_chain.invoke({"input": query})
Markdown(outputs['answer'])

從文件資料庫中檢索相關資訊-03

同樣的過程可用於各種查詢,例如解釋財務報表附註或總結年度報告,從而展示了管道的多功能性。

以下是完整程式碼:AV-multimodal-gemma3-rag

使用案例

該管道有許多應用:

  • 財務報告:自動提取和彙總關鍵財務報表、現金流要素和年度報告細節。
  • 文件分析:將 PDF 轉換為結構化資料,用於進一步分析或機器學習任務。
  • 多模態搜尋:結合文字和視覺內容,實現混合媒體檔案的搜尋和檢索。
  • 商業智慧:透過聚合和綜合各種模式的資訊,快速洞察複雜的文件。

小結

在本教學中,我們演示瞭如何在 Google Colab 中使用 Gemma 3 構建多模態 RAG。透過整合 Colab-Xterm、Ollama 模型(Gemma 3)、DoclingLangChainMilvus 等工具,我們建立了一個能夠處理文字、表格和影像的系統。這一功能強大的設定不僅能實現有效的文件檢索,還能在各種應用中支援複雜的查詢回答和分析。無論您處理的是財務報告、研究論文還是商業智慧任務,該管道都能為您提供多功能、可擴充套件的解決方案。

祝您編碼愉快,並盡情探索多模態檢索增強生成的可能性!

評論留言