在Spring Boot中整合Stripe的指南

在Spring Boot中整合Stripe的指南

隨著數字交易的興起,無縫整合支付閘道器的能力已成為開發人員的一項重要技能。無論是市場還是 SaaS 產品,支付處理器對於收集和處理使用者付款都至關重要。

本文將介紹如何在 Spring Boot 環境中整合 Stripe,如何設定訂閱、提供免費試用以及為客戶構建自助服務頁面以下載付款發票。

什麼是 Stripe?

Stripe 是全球知名的支付處理平臺,在 46 個國家/地區提供服務。如果您想在自己的網路應用程式中整合支付功能,Stripe 是一個不錯的選擇,因為它覆蓋範圍廣、聲譽好、文件詳盡。

瞭解常見的 Stripe 概念

瞭解 Stripe 用於協調和執行多方支付操作的一些常用概念很有幫助。Stripe 提供兩種在應用程式中實現支付整合的方法。

您可以在應用程式中嵌入 Stripe 表單,以獲得應用程式內的客戶體驗(支付意圖),或者將客戶重定向到 Stripe 託管的支付頁面,由 Stripe 管理流程,並在支付成功或失敗時通知您的應用程式(支付連結)。

支付意圖

處理付款時,在提示客戶提供銀行卡資訊和付款之前,必須事先收集客戶和產品的詳細資訊。這些詳細資訊包括描述、總金額、付款方式等。

Stripe 要求您在應用程式中收集這些詳細資訊,並在其後臺生成 PaymentIntent 物件。這種方法能讓 Stripe 為該意圖制定一個支付請求。付款結束後,您可以通過 PaymentIntent 物件持續檢索付款詳細資訊,包括付款目的。

支付連結

為了避免將 Stripe 直接整合到程式碼庫中的複雜性,可以考慮使用 Stripe Checkouts 作為託管支付解決方案。就像建立 PaymentIntent 一樣,你將建立一個包含付款和客戶詳細資訊的 CheckoutSessionCheckoutSession 不會啟動應用程式內的 PaymentIntent ,而是生成一個付款連結,將客戶重定向到該連結。這就是託管支付頁面的樣子:
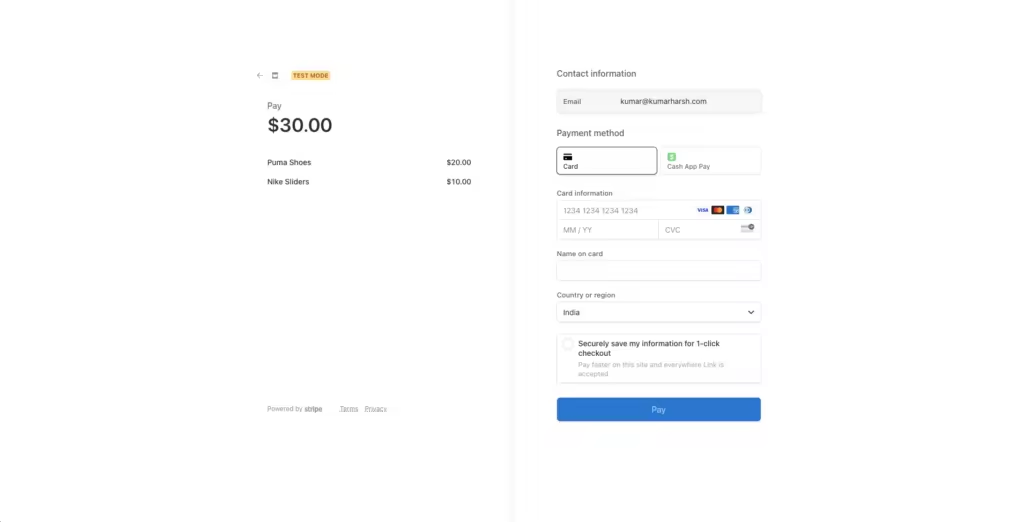
Stripe 託管的結賬頁面

Stripe 託管的結賬頁面

付款後,Stripe 會重定向回到您的應用程式,從而實現確認和交付請求等付款後任務。為確保可靠性,可配置一個後臺網路鉤子來更新 Stripe,即使客戶在付款後不小心關閉了頁面,也能確保保留付款資料。

這種方法雖然有效,但在定製和設計方面缺乏靈活性。對於移動應用程式來說,正確設定這種方法也很棘手,因為原生整合看起來會更無縫。

API Keys

API 金鑰使用 Stripe API 時,您需要訪問 API 金鑰,以便客戶端和伺服器應用程式與 Stripe 後臺進行互動。您可以在 Stripe 開發人員控制面板上訪問您的 Stripe API 金鑰。如下所示

顯示 API 金鑰的 Stripe 面板

顯示 API 金鑰的 Stripe 面板

Stripe 支付如何運作?

要了解 Stripe 支付是如何運作的,你需要了解所有相關方。每筆支付交易都涉及四個利益相關者:

  1. 客戶:打算為服務/產品付款的人。
  2. 商家:您,企業主,負責收款和銷售服務/產品。
  3. 收款方:代表你(商家)處理付款並將你的付款請求轉給客戶銀行的銀行。收單銀行可能會與第三方合作幫助處理付款。
  4. 髮卡銀行:向消費者提供信貸、發行銀行卡和其他支付方式的銀行。

以下是這些利益相關者之間典型的支付流程。

線上支付如何運作

線上支付如何運作

顧客讓商家知道他們願意付款。然後,商戶將與付款有關的詳細資訊轉發給收單銀行,收單銀行從客戶的髮卡銀行收取付款,並通知商戶付款成功。

這是支付流程的一個非常高層次的概述。作為商家,您只需關注收集支付意向、將其傳遞給支付處理商以及處理支付結果。不過,正如前面所討論的,有兩種方法可以實現這一點。

在建立 Stripe 管理的結賬會話時,Stripe 會負責收集支付詳情,以下是典型的流程:

Stripe 託管結賬支付工作流程

Stripe 託管結賬支付工作流程  (Source: Stripe Docs)

有了自定義支付流程,一切就真的取決於你了。您可以根據自己應用程式的需要設計客戶端、伺服器、客戶和 Stripe API 之間的互動。您可以根據需要在此工作流中新增地址收集、發票生成、取消、免費試用等功能。

現在,您已經瞭解了 Stripe 支付的工作原理,可以開始在您的 Java 應用程式中構建它了。

在 Spring Boot 應用程式中整合 Stripe

要開始 Stripe 整合,請建立一個前端應用程式與 Java 後臺互動並啟動支付。在本教學中,您將構建一個 React 應用程式來觸發各種支付型別和訂閱,從而清楚地瞭解它們的機制。

注:本教學不包括構建一個完整的電子商務網站;它的主要目的是指導您完成將 Stripe 整合到 Spring Boot 的簡單過程。

設定前端和後端專案

通過執行以下命令,使用 Vite 建立一個新目錄並構建一個 React 專案:

Plain text
Copy to clipboard
Open code in new window
EnlighterJS 3 Syntax Highlighter
npm create vite@latest

將專案名稱設為 frontend(或任何首選名稱),框架設為 React,變數設為 TypeScript。導航至專案目錄,執行以下命令安裝 Chakra UI,以便快速為 UI 元素搭建腳手架:

Plain text
Copy to clipboard
Open code in new window
EnlighterJS 3 Syntax Highlighter
npm i @chakra-ui/react @emotion/react @emotion/styled framer-motion @chakra-ui/icons

執行下面的命令,還可以在專案中安裝 react-router-dom ,用於客戶端路由:

Plain text
Copy to clipboard
Open code in new window
EnlighterJS 3 Syntax Highlighter
npm i react-router-dom

現在,您可以開始構建前端應用程式了。下面是您要構建的主頁。

已完成的前端應用程式主頁

已完成的前端應用程式主頁

點選該頁面上的任何按鈕,都將進入帶有支付表單的獨立結賬頁面。首先,在 frontend/src 目錄中新建一個名為 routes 的資料夾。在這個資料夾中,建立一個 Home.tsx 檔案。該檔案將包含應用程式主頁路由 ( / ) 的程式碼。將以下程式碼貼上到檔案中:

Plain text
Copy to clipboard
Open code in new window
EnlighterJS 3 Syntax Highlighter
import {Button, Center, Heading, VStack} from "@chakra-ui/react";
import { useNavigate } from "react-router-dom";
function Home() {
const navigate = useNavigate()
const navigateToIntegratedCheckout = () => {
navigate("/integrated-checkout")
}
const navigateToHostedCheckout = () => {
navigate("/hosted-checkout")
}
const navigateToNewSubscription = () => {
navigate("/new-subscription")
}
const navigateToCancelSubscription = () => {
navigate("/cancel-subscription")
}
const navigateToSubscriptionWithTrial = () => {
navigate("/subscription-with-trial")
}
const navigateToViewInvoices = () => {
navigate("/view-invoices")
}
return (
<>
<Center h={'100vh'} color='black'>
<VStack spacing='24px'>
<Heading>Stripe Payments With React & Java</Heading>
<Button
colorScheme={'teal'}
onClick={navigateToIntegratedCheckout}>
Integrated Checkout
</Button>
<Button
colorScheme={'blue'}
onClick={navigateToHostedCheckout}>
Hosted Checkout
</Button>
<Button
colorScheme={'yellow'}
onClick={navigateToNewSubscription}>
New Subscription
</Button>
<Button
colorScheme={'purple'}
onClick={navigateToCancelSubscription}>
Cancel Subscription
</Button>
<Button
colorScheme={'facebook'}
onClick={navigateToSubscriptionWithTrial}>
Subscription With Trial
</Button>
<Button
colorScheme={'pink'}
onClick={navigateToViewInvoices}>
View Invoices
</Button>
</VStack>
</Center>
</>
)
}
export default Home
import {Button, Center, Heading, VStack} from "@chakra-ui/react"; import { useNavigate } from "react-router-dom"; function Home() { const navigate = useNavigate() const navigateToIntegratedCheckout = () => { navigate("/integrated-checkout") } const navigateToHostedCheckout = () => { navigate("/hosted-checkout") } const navigateToNewSubscription = () => { navigate("/new-subscription") } const navigateToCancelSubscription = () => { navigate("/cancel-subscription") } const navigateToSubscriptionWithTrial = () => { navigate("/subscription-with-trial") } const navigateToViewInvoices = () => { navigate("/view-invoices") } return ( <> <Center h={'100vh'} color='black'> <VStack spacing='24px'> <Heading>Stripe Payments With React & Java</Heading> <Button colorScheme={'teal'} onClick={navigateToIntegratedCheckout}> Integrated Checkout </Button> <Button colorScheme={'blue'} onClick={navigateToHostedCheckout}> Hosted Checkout </Button> <Button colorScheme={'yellow'} onClick={navigateToNewSubscription}> New Subscription </Button> <Button colorScheme={'purple'} onClick={navigateToCancelSubscription}> Cancel Subscription </Button> <Button colorScheme={'facebook'} onClick={navigateToSubscriptionWithTrial}> Subscription With Trial </Button> <Button colorScheme={'pink'} onClick={navigateToViewInvoices}> View Invoices </Button> </VStack> </Center> </> ) } export default Home
import {Button, Center, Heading, VStack} from "@chakra-ui/react";
import { useNavigate } from "react-router-dom";
function Home() {
const navigate = useNavigate()
const navigateToIntegratedCheckout = () => {
navigate("/integrated-checkout")
}
const navigateToHostedCheckout = () => {
navigate("/hosted-checkout")
}
const navigateToNewSubscription = () => {
navigate("/new-subscription")
}
const navigateToCancelSubscription = () => {
navigate("/cancel-subscription")
}
const navigateToSubscriptionWithTrial = () => {
navigate("/subscription-with-trial")
}
const navigateToViewInvoices = () => {
navigate("/view-invoices")
}
return (
<>
<Center h={'100vh'} color='black'>
<VStack spacing='24px'>
<Heading>Stripe Payments With React & Java</Heading>
<Button
colorScheme={'teal'}
onClick={navigateToIntegratedCheckout}>
Integrated Checkout
</Button>
<Button
colorScheme={'blue'}
onClick={navigateToHostedCheckout}>
Hosted Checkout
</Button>
<Button
colorScheme={'yellow'}
onClick={navigateToNewSubscription}>
New Subscription
</Button>
<Button
colorScheme={'purple'}
onClick={navigateToCancelSubscription}>
Cancel Subscription
</Button>
<Button
colorScheme={'facebook'}
onClick={navigateToSubscriptionWithTrial}>
Subscription With Trial
</Button>
<Button
colorScheme={'pink'}
onClick={navigateToViewInvoices}>
View Invoices
</Button>
</VStack>
</Center>
</>
)
}
export default Home

要在應用程式中啟用導航功能,請更新 App.tsx 檔案,配置 react-router-dom 中的 RouteProvider 類。

Plain text
Copy to clipboard
Open code in new window
EnlighterJS 3 Syntax Highlighter
import Home from "./routes/Home.tsx";
import {
createBrowserRouter,
RouterProvider,
} from "react-router-dom";
function App() {
const router = createBrowserRouter([
{
path: "/",
element: (
<Home/>
),
},
]);
return (
<RouterProvider router={router}/>
)
}
export default App
import Home from "./routes/Home.tsx"; import { createBrowserRouter, RouterProvider, } from "react-router-dom"; function App() { const router = createBrowserRouter([ { path: "/", element: ( <Home/> ), }, ]); return ( <RouterProvider router={router}/> ) } export default App
import Home from "./routes/Home.tsx";
import {
createBrowserRouter,
RouterProvider,
} from "react-router-dom";
function App() {
const router = createBrowserRouter([
{
path: "/",
element: (
<Home/>
),
},
]);
return (
<RouterProvider router={router}/>
)
}
export default App

執行 npm run dev 命令,在 https://localhost:5173 上預覽應用程式。

至此,前臺應用程式所需的初始設定完成。接下來,使用 Spring Boot 建立後端應用程式。要初始化應用程式,可以使用 spring initializr 網站(如果 IDE 支援建立 Spring 應用程式,則無需使用該網站)。

IntelliJ IDEA 支援建立 Spring Boot 應用程式。首先在 IntelliJ IDEA 上選擇 “New Project” 選項。然後,在左側窗格中選擇 Spring Initializr。輸入後端專案的詳細資訊:名稱(backend)、位置(stripe-payments-java 目錄)、語言(Java)和型別(Maven)。對於組名和工件名,請分別使用 com.kinsta.stripe-javabackend

IDEA 新專案對話方塊

IDEA 新專案對話方塊

單擊 “Next” 按鈕。然後,在 “依賴關係” 窗格的 “Web” 下拉選單中選擇 Spring Web,為專案新增依賴關係,並單擊 “Create” 按鈕。

選擇依賴項

選擇依賴項

這將建立 Java 專案並在整合開發環境中開啟。現在,您可以使用 Stripe 建立各種結賬流程。

接受線上產品購買付款

Stripe 最重要、使用最廣泛的功能是接受客戶的一次性付款。在本節中,您將學習在應用程式中使用 Stripe 整合支付處理的兩種方法。

託管結賬

首先,您需要建立一個可觸發託管支付工作流的結賬頁面,在該工作流中,您只需從前端應用程式觸發支付。然後,Stripe 負責收集客戶的銀行卡資訊並收取付款,最後只共享付款操作的結果。

這就是結賬頁面的樣子:
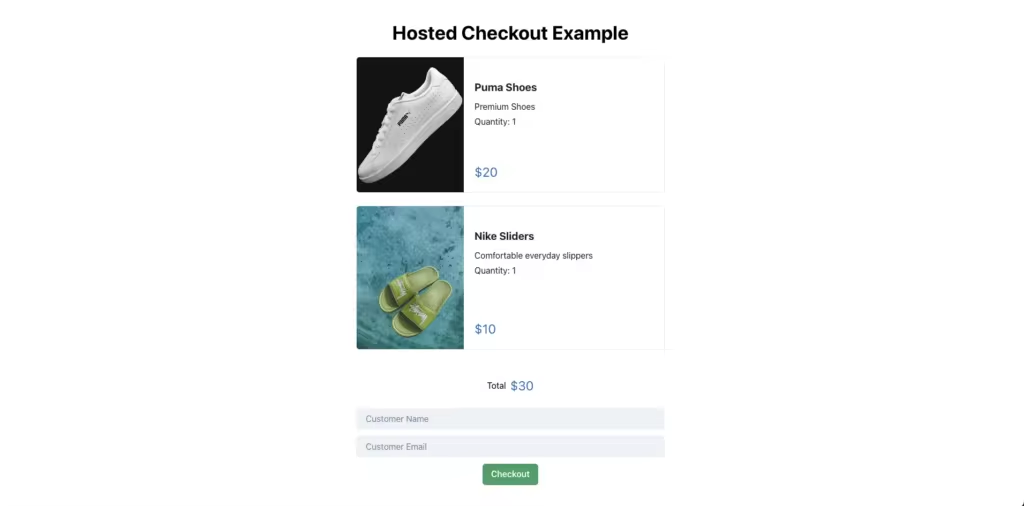
完成託管結賬頁面

完成託管結賬頁面

該頁面有三個主要元件: CartItem – 表示每個購物車專案; TotalFooter – 顯示總金額; CustomerDetails – 收集客戶詳細資訊。您可以重複使用這些元件,為本文中的其他場景(如整合結賬和訂閱)建立結賬表單。

構建前臺

frontend/src 目錄中建立一個 components 資料夾。在 components 資料夾中,建立一個新檔案 CartItem.tsx,並貼上以下程式碼:

Plain text
Copy to clipboard
Open code in new window
EnlighterJS 3 Syntax Highlighter
import {Button, Card, CardBody, CardFooter, Heading, Image, Stack, Text, VStack} from "@chakra-ui/react";
function CartItem(props: CartItemProps) {
return <Card direction={{base: 'column', sm: 'row'}}
overflow='hidden'
width={'xl'}
variant='outline'>
<Image
objectFit='cover'
maxW={{base: '100%', sm: '200px'}}
src={props.data.image}
/>
<Stack mt='6' spacing='3'>
<CardBody>
<VStack spacing={'3'} alignItems={"flex-start"}>
<Heading size='md'>{props.data.name}</Heading>
<VStack spacing={'1'} alignItems={"flex-start"}>
<Text>
{props.data.description}
</Text>
{(props.mode === "checkout" ? <Text>
{"Quantity: " + props.data.quantity}
</Text> : <></>)}
</VStack>
</VStack>
</CardBody>
<CardFooter>
<VStack alignItems={'flex-start'}>
<Text color='blue.600' fontSize='2xl'>
{"$" + props.data.price}
</Text>
</VStack>
</CardFooter>
</Stack>
</Card>
}
export interface ItemData {
name: string
price: number
quantity: number
image: string
description: string
id: string
}
interface CartItemProps {
data: ItemData
mode: "subscription" | "checkout"
onCancelled?: () => void
}
export default CartItem
import {Button, Card, CardBody, CardFooter, Heading, Image, Stack, Text, VStack} from "@chakra-ui/react"; function CartItem(props: CartItemProps) { return <Card direction={{base: 'column', sm: 'row'}} overflow='hidden' width={'xl'} variant='outline'> <Image objectFit='cover' maxW={{base: '100%', sm: '200px'}} src={props.data.image} /> <Stack mt='6' spacing='3'> <CardBody> <VStack spacing={'3'} alignItems={"flex-start"}> <Heading size='md'>{props.data.name}</Heading> <VStack spacing={'1'} alignItems={"flex-start"}> <Text> {props.data.description} </Text> {(props.mode === "checkout" ? <Text> {"Quantity: " + props.data.quantity} </Text> : <></>)} </VStack> </VStack> </CardBody> <CardFooter> <VStack alignItems={'flex-start'}> <Text color='blue.600' fontSize='2xl'> {"$" + props.data.price} </Text> </VStack> </CardFooter> </Stack> </Card> } export interface ItemData { name: string price: number quantity: number image: string description: string id: string } interface CartItemProps { data: ItemData mode: "subscription" | "checkout" onCancelled?: () => void } export default CartItem
import {Button, Card, CardBody, CardFooter, Heading, Image, Stack, Text, VStack} from "@chakra-ui/react";
function CartItem(props: CartItemProps) {
return <Card direction={{base: 'column', sm: 'row'}}
overflow='hidden'
width={'xl'}
variant='outline'>
<Image
objectFit='cover'
maxW={{base: '100%', sm: '200px'}}
src={props.data.image}
/>
<Stack mt='6' spacing='3'>
<CardBody>
<VStack spacing={'3'} alignItems={"flex-start"}>
<Heading size='md'>{props.data.name}</Heading>
<VStack spacing={'1'} alignItems={"flex-start"}>
<Text>
{props.data.description}
</Text>
{(props.mode === "checkout" ? <Text>
{"Quantity: " + props.data.quantity}
</Text> : <></>)}
</VStack>
</VStack>
</CardBody>
<CardFooter>
<VStack alignItems={'flex-start'}>
<Text color='blue.600' fontSize='2xl'>
{"$" + props.data.price}
</Text>
</VStack>
</CardFooter>
</Stack>
</Card>
}
export interface ItemData {
name: string
price: number
quantity: number
image: string
description: string
id: string
}
interface CartItemProps {
data: ItemData
mode: "subscription" | "checkout"
onCancelled?: () => void
}
export default CartItem

上面的程式碼定義了兩個介面,作為傳遞給元件的屬性型別。 ItemData 型別可匯出,以便在其他元件中重複使用。

程式碼將返回購物車專案元件的佈局。它利用提供的道具在螢幕上呈現專案。

接下來,在 components 目錄中建立一個 TotalFooter.tsx 檔案,並貼上以下程式碼:

Plain text
Copy to clipboard
Open code in new window
EnlighterJS 3 Syntax Highlighter
import {Divider, HStack, Text} from "@chakra-ui/react";
function TotalFooter(props: TotalFooterProps) {
return <>
<Divider />
<HStack>
<Text>Total</Text>
<Text color='blue.600' fontSize='2xl'>
{"$" + props.total}
</Text>
</HStack>
{props.mode === "subscription" &&
<Text fontSize={"xs"}>(Monthly, starting today)</Text>
}
{props.mode === "trial" &&
<Text fontSize={"xs"}>(Monthly, starting next month)</Text>
}
</>
}
interface TotalFooterProps {
total: number
mode: "checkout" | "subscription" | "trial"
}
export default TotalFooter
import {Divider, HStack, Text} from "@chakra-ui/react"; function TotalFooter(props: TotalFooterProps) { return <> <Divider /> <HStack> <Text>Total</Text> <Text color='blue.600' fontSize='2xl'> {"$" + props.total} </Text> </HStack> {props.mode === "subscription" && <Text fontSize={"xs"}>(Monthly, starting today)</Text> } {props.mode === "trial" && <Text fontSize={"xs"}>(Monthly, starting next month)</Text> } </> } interface TotalFooterProps { total: number mode: "checkout" | "subscription" | "trial" } export default TotalFooter
import {Divider, HStack, Text} from "@chakra-ui/react";
function TotalFooter(props: TotalFooterProps) {
return <>
<Divider />
<HStack>
<Text>Total</Text>
<Text color='blue.600' fontSize='2xl'>
{"$" + props.total}
</Text>
</HStack>
{props.mode === "subscription" &&
<Text fontSize={"xs"}>(Monthly, starting today)</Text>
}
{props.mode === "trial" &&
<Text fontSize={"xs"}>(Monthly, starting next month)</Text>
}
</>
}
interface TotalFooterProps {
total: number
mode: "checkout" | "subscription" | "trial"
}
export default TotalFooter

TotalFooter 元件顯示購物車的總價值,並使用 mode 值有條件地渲染特定文字。

最後,建立 CustomerDetails.tsx 元件並貼上以下程式碼:

Plain text
Copy to clipboard
Open code in new window
EnlighterJS 3 Syntax Highlighter
import {ItemData} from "./CartItem.tsx";
import {Button, Input, VStack} from "@chakra-ui/react";
import {useState} from "react";
function CustomerDetails(props: CustomerDetailsProp) {
const [name, setName] = useState("")
const [email, setEmail] = useState("")
const onCustomerNameChange = (ev: React.ChangeEvent<HTMLInputElement>) => {
setName(ev.target.value)
}
const onCustomerEmailChange = (ev: React.ChangeEvent<HTMLInputElement>) => {
setEmail(ev.target.value)
}
const initiatePayment = () => {
fetch(process.env.VITE_SERVER_BASE_URL + props.endpoint, {
method: "POST",
headers: {'Content-Type': 'application/json'},
body: JSON.stringify({
items: props.data.map(elem => ({name: elem.name, id: elem.id})),
customerName: name,
customerEmail: email,
})
})
.then(r => r.text())
.then(r => {
window.location.href = r
})
}
return <>
<VStack spacing={3} width={'xl'}>
<Input variant='filled' placeholder='Customer Name' onChange={onCustomerNameChange} value={name}/>
<Input variant='filled' placeholder='Customer Email' onChange={onCustomerEmailChange} value={email}/>
<Button onClick={initiatePayment} colorScheme={'green'}>Checkout</Button>
</VStack>
</>
}
interface CustomerDetailsProp {
data: ItemData[]
endpoint: string
}
export default CustomerDetails
import {ItemData} from "./CartItem.tsx"; import {Button, Input, VStack} from "@chakra-ui/react"; import {useState} from "react"; function CustomerDetails(props: CustomerDetailsProp) { const [name, setName] = useState("") const [email, setEmail] = useState("") const onCustomerNameChange = (ev: React.ChangeEvent<HTMLInputElement>) => { setName(ev.target.value) } const onCustomerEmailChange = (ev: React.ChangeEvent<HTMLInputElement>) => { setEmail(ev.target.value) } const initiatePayment = () => { fetch(process.env.VITE_SERVER_BASE_URL + props.endpoint, { method: "POST", headers: {'Content-Type': 'application/json'}, body: JSON.stringify({ items: props.data.map(elem => ({name: elem.name, id: elem.id})), customerName: name, customerEmail: email, }) }) .then(r => r.text()) .then(r => { window.location.href = r }) } return <> <VStack spacing={3} width={'xl'}> <Input variant='filled' placeholder='Customer Name' onChange={onCustomerNameChange} value={name}/> <Input variant='filled' placeholder='Customer Email' onChange={onCustomerEmailChange} value={email}/> <Button onClick={initiatePayment} colorScheme={'green'}>Checkout</Button> </VStack> </> } interface CustomerDetailsProp { data: ItemData[] endpoint: string } export default CustomerDetails
import {ItemData} from "./CartItem.tsx";
import {Button, Input, VStack} from "@chakra-ui/react";
import {useState} from "react";
function CustomerDetails(props: CustomerDetailsProp) {
const [name, setName] = useState("")
const [email, setEmail] = useState("")
const onCustomerNameChange = (ev: React.ChangeEvent<HTMLInputElement>) => {
setName(ev.target.value)
}
const onCustomerEmailChange = (ev: React.ChangeEvent<HTMLInputElement>) => {
setEmail(ev.target.value)
}
const initiatePayment = () => {
fetch(process.env.VITE_SERVER_BASE_URL + props.endpoint, {
method: "POST",
headers: {'Content-Type': 'application/json'},
body: JSON.stringify({
items: props.data.map(elem => ({name: elem.name, id: elem.id})),
customerName: name,
customerEmail: email,
})
})
.then(r => r.text())
.then(r => {
window.location.href = r
})
}
return <>
<VStack spacing={3} width={'xl'}>
<Input variant='filled' placeholder='Customer Name' onChange={onCustomerNameChange} value={name}/>
<Input variant='filled' placeholder='Customer Email' onChange={onCustomerEmailChange} value={email}/>
<Button onClick={initiatePayment} colorScheme={'green'}>Checkout</Button>
</VStack>
</>
}
interface CustomerDetailsProp {
data: ItemData[]
endpoint: string
}
export default CustomerDetails

上面的程式碼顯示了一個帶有兩個輸入框的表單–用於收集使用者的姓名和電子郵件。點選 Checkout 按鈕後,將呼叫 initiatePayment 方法向後臺傳送結賬請求。

它會請求您傳遞給元件的端點,並將客戶資訊和購物車專案作為請求的一部分傳送,然後將使用者重定向到從伺服器接收到的 URL。該 URL 將引導使用者進入 Stripe 伺服器上的結賬頁面。稍後我們將介紹如何建立該 URL。

注:此元件使用環境變數 VITE_SERVER_BASE_URL 來設定後端伺服器 URL。請在專案根目錄下建立 .env 檔案進行設定:

Plain text
Copy to clipboard
Open code in new window
EnlighterJS 3 Syntax Highlighter
VITE_SERVER_BASE_URL=http://localhost:8080

所有元件都已建立。現在,讓我們使用這些元件建立託管結賬路由。為此,請在 routes 資料夾中建立一個新的 HostedCheckout.tsx 檔案,程式碼如下:

Plain text
Copy to clipboard
Open code in new window
EnlighterJS 3 Syntax Highlighter
import {Center, Heading, VStack} from "@chakra-ui/react";
import {useState} from "react";
import CartItem, {ItemData} from "../components/CartItem.tsx";
import TotalFooter from "../components/TotalFooter.tsx";
import CustomerDetails from "../components/CustomerDetails.tsx";
import {Products} from '../data.ts'
function HostedCheckout() {
const [items] = useState<ItemData[]>(Products)
return <>
<Center h={'100vh'} color='black'>
<VStack spacing='24px'>
<Heading>Hosted Checkout Example</Heading>
{items.map(elem => {
return <CartItem data={elem} mode={'checkout'}/>
})}
<TotalFooter total={30} mode={"checkout"}/>
<CustomerDetails data={items} endpoint={"/checkout/hosted"} mode={"checkout"}/>
</VStack>
</Center>
</>
}
export default HostedCheckout
import {Center, Heading, VStack} from "@chakra-ui/react"; import {useState} from "react"; import CartItem, {ItemData} from "../components/CartItem.tsx"; import TotalFooter from "../components/TotalFooter.tsx"; import CustomerDetails from "../components/CustomerDetails.tsx"; import {Products} from '../data.ts' function HostedCheckout() { const [items] = useState<ItemData[]>(Products) return <> <Center h={'100vh'} color='black'> <VStack spacing='24px'> <Heading>Hosted Checkout Example</Heading> {items.map(elem => { return <CartItem data={elem} mode={'checkout'}/> })} <TotalFooter total={30} mode={"checkout"}/> <CustomerDetails data={items} endpoint={"/checkout/hosted"} mode={"checkout"}/> </VStack> </Center> </> } export default HostedCheckout
import {Center, Heading, VStack} from "@chakra-ui/react";
import {useState} from "react";
import CartItem, {ItemData} from "../components/CartItem.tsx";
import TotalFooter from "../components/TotalFooter.tsx";
import CustomerDetails from "../components/CustomerDetails.tsx";
import {Products} from '../data.ts'
function HostedCheckout() {
const [items] = useState<ItemData[]>(Products)
return <>
<Center h={'100vh'} color='black'>
<VStack spacing='24px'>
<Heading>Hosted Checkout Example</Heading>
{items.map(elem => {
return <CartItem data={elem} mode={'checkout'}/>
})}
<TotalFooter total={30} mode={"checkout"}/>
<CustomerDetails data={items} endpoint={"/checkout/hosted"} mode={"checkout"}/>
</VStack>
</Center>
</>
}
export default HostedCheckout

此路由使用剛才構建的三個元件來組裝一個結賬螢幕。所有元件模式都配置為 checkout,並向表單元件提供了 /checkout/hosted 端點,以便準確地啟動結賬請求。

該元件使用 Products 物件來填充專案陣列。在實際應用中,該資料來自購物車 API,其中包含使用者選擇的專案。不過,在本教學中,陣列是由指令碼中的靜態列表填充的。在前端專案的根目錄下建立一個 data.ts 檔案,並在其中儲存以下程式碼,從而定義陣列:

Plain text
Copy to clipboard
Open code in new window
EnlighterJS 3 Syntax Highlighter
import {ItemData} from "./components/CartItem.tsx";
export const Products: ItemData[] = [
{
description: "Premium Shoes",
image: "https://source.unsplash.com/NUoPWImmjCU",
name: "Puma Shoes",
price: 20,
quantity: 1,
id: "shoe"
},
{
description: "Comfortable everyday slippers",
image: "https://source.unsplash.com/K_gIPI791Jo",
name: "Nike Sliders",
price: 10,
quantity: 1,
id: "slippers"
},
]
import {ItemData} from "./components/CartItem.tsx"; export const Products: ItemData[] = [ { description: "Premium Shoes", image: "https://source.unsplash.com/NUoPWImmjCU", name: "Puma Shoes", price: 20, quantity: 1, id: "shoe" }, { description: "Comfortable everyday slippers", image: "https://source.unsplash.com/K_gIPI791Jo", name: "Nike Sliders", price: 10, quantity: 1, id: "slippers" }, ]
import {ItemData} from "./components/CartItem.tsx";
export const Products: ItemData[] = [
{
description: "Premium Shoes",
image: "https://source.unsplash.com/NUoPWImmjCU",
name: "Puma Shoes",
price: 20,
quantity: 1,
id: "shoe"
},
{
description: "Comfortable everyday slippers",
image: "https://source.unsplash.com/K_gIPI791Jo",
name: "Nike Sliders",
price: 10,
quantity: 1,
id: "slippers"
},
]

該檔案定義了購物車中呈現的產品陣列中的兩個專案。您可以隨意調整產品的值。

作為構建前端的最後一步,建立兩個新路由來處理成功和失敗。Stripe 託管的結賬頁面將根據交易結果,通過這兩條路由將使用者重定向到您的應用程式。Stripe 還會為您的路由提供與交易相關的有效載荷,例如結賬會話 ID,您可以用它來檢索相應的結賬會話物件,並訪問付款方式、發票詳情等結賬相關資料。

為此,請在 src/routes 目錄中建立 Success.tsx 檔案,並儲存以下程式碼:

Plain text
Copy to clipboard
Open code in new window
EnlighterJS 3 Syntax Highlighter
import {Button, Center, Heading, Text, VStack} from "@chakra-ui/react";
import {useNavigate} from "react-router-dom";
function Success() {
const queryParams = new URLSearchParams(window.location.search)
const navigate = useNavigate()
const onButtonClick = () => {
navigate("/")
}
return <Center h={'100vh'} color='green'>
<VStack spacing={3}>
<Heading fontSize={'4xl'}>Success!</Heading>
<Text color={'black'}>{queryParams.toString().split("&").join("\n")}</Text>
<Button onClick={onButtonClick} colorScheme={'green'}>Go Home</Button>
</VStack>
</Center>
}
export default Success
import {Button, Center, Heading, Text, VStack} from "@chakra-ui/react"; import {useNavigate} from "react-router-dom"; function Success() { const queryParams = new URLSearchParams(window.location.search) const navigate = useNavigate() const onButtonClick = () => { navigate("/") } return <Center h={'100vh'} color='green'> <VStack spacing={3}> <Heading fontSize={'4xl'}>Success!</Heading> <Text color={'black'}>{queryParams.toString().split("&").join("\n")}</Text> <Button onClick={onButtonClick} colorScheme={'green'}>Go Home</Button> </VStack> </Center> } export default Success
import {Button, Center, Heading, Text, VStack} from "@chakra-ui/react";
import {useNavigate} from "react-router-dom";
function Success() {
const queryParams = new URLSearchParams(window.location.search)
const navigate = useNavigate()
const onButtonClick = () => {
navigate("/")
}
return <Center h={'100vh'} color='green'>
<VStack spacing={3}>
<Heading fontSize={'4xl'}>Success!</Heading>
<Text color={'black'}>{queryParams.toString().split("&").join("\n")}</Text>
<Button onClick={onButtonClick} colorScheme={'green'}>Go Home</Button>
</VStack>
</Center>
}
export default Success

渲染時,該元件會顯示 “Success!” 訊息,並在螢幕上列印任何 URL 查詢引數。它還包括一個將使用者重定向到應用程式主頁的按鈕。

在構建現實世界的應用程式時,該頁面是您處理非關鍵應用程式側事務的地方,這些事務取決於手頭交易的成功與否。例如,如果您正在為一家線上商店建立一個結賬頁面,您可以使用該頁面向使用者顯示確認資訊以及所購產品的交付時間。

接下來,建立一個 Failure.tsx 檔案,其中包含以下程式碼:

Plain text
Copy to clipboard
Open code in new window
EnlighterJS 3 Syntax Highlighter
import {Button, Center, Heading, Text, VStack} from "@chakra-ui/react";
import {useNavigate} from "react-router-dom";
function Failure() {
const queryParams = new URLSearchParams(window.location.search)
const navigate = useNavigate()
const onButtonClick = () => {
navigate("/")
}
return <Center h={'100vh'} color='red'>
<VStack spacing={3}>
<Heading fontSize={'4xl'}>Failure!</Heading>
<Text color={'black'}>{queryParams.toString().split("&").join("\n")}</Text>
<Button onClick={onButtonClick} colorScheme={'red'}>Try Again</Button>
</VStack>
</Center>
}
export default Failure
import {Button, Center, Heading, Text, VStack} from "@chakra-ui/react"; import {useNavigate} from "react-router-dom"; function Failure() { const queryParams = new URLSearchParams(window.location.search) const navigate = useNavigate() const onButtonClick = () => { navigate("/") } return <Center h={'100vh'} color='red'> <VStack spacing={3}> <Heading fontSize={'4xl'}>Failure!</Heading> <Text color={'black'}>{queryParams.toString().split("&").join("\n")}</Text> <Button onClick={onButtonClick} colorScheme={'red'}>Try Again</Button> </VStack> </Center> } export default Failure
import {Button, Center, Heading, Text, VStack} from "@chakra-ui/react";
import {useNavigate} from "react-router-dom";
function Failure() {
const queryParams = new URLSearchParams(window.location.search)
const navigate = useNavigate()
const onButtonClick = () => {
navigate("/")
}
return <Center h={'100vh'} color='red'>
<VStack spacing={3}>
<Heading fontSize={'4xl'}>Failure!</Heading>
<Text color={'black'}>{queryParams.toString().split("&").join("\n")}</Text>
<Button onClick={onButtonClick} colorScheme={'red'}>Try Again</Button>
</VStack>
</Center>
}
export default Failure

該元件與 Success.tsx 類似,在渲染時顯示 “Failure!”資訊。

提示:避免在成功或失敗頁面上傳遞關鍵資訊或執行關鍵操作,因為如果客戶關閉瀏覽器標籤或失去連線,他們可能永遠無法進入這兩個頁面。

對於產品交付、傳送電子郵件或購買流程的任何關鍵部分等重要任務,請使用網路鉤子。網路鉤子是 Stripe 在交易發生時可以呼叫的伺服器上的 API 路由。

網路鉤子接收完整的交易詳細資訊(通過 CheckoutSession 物件),允許您將其記錄到應用程式資料庫中,並觸發相應的成功或失敗工作流。由於 Stripe 可以隨時訪問您的伺服器,因此不會遺漏任何交易,從而確保了線上商店功能的一致性。

最後,更新 App.tsx 檔案,使其看起來像這樣:

Plain text
Copy to clipboard
Open code in new window
EnlighterJS 3 Syntax Highlighter
import Home from "./routes/Home.tsx";
import {createBrowserRouter, RouterProvider,} from "react-router-dom";
import HostedCheckout from "./routes/HostedCheckout.tsx";
import Success from "./routes/Success.tsx";
import Failure from "./routes/Failure.tsx";
function App() {
const router = createBrowserRouter([
{
path: "/",
element: (
<Home/>
),
},
{
path: "/hosted-checkout",
element: (
<HostedCheckout/>
)
},
{
path: '/success',
element: (
<Success/>
)
},
{
path: '/failure',
element: (
<Failure/>
)
},
]);
return (
<RouterProvider router={router}/>
)
}
export default App
import Home from "./routes/Home.tsx"; import {createBrowserRouter, RouterProvider,} from "react-router-dom"; import HostedCheckout from "./routes/HostedCheckout.tsx"; import Success from "./routes/Success.tsx"; import Failure from "./routes/Failure.tsx"; function App() { const router = createBrowserRouter([ { path: "/", element: ( <Home/> ), }, { path: "/hosted-checkout", element: ( <HostedCheckout/> ) }, { path: '/success', element: ( <Success/> ) }, { path: '/failure', element: ( <Failure/> ) }, ]); return ( <RouterProvider router={router}/> ) } export default App
import Home from "./routes/Home.tsx";
import {createBrowserRouter, RouterProvider,} from "react-router-dom";
import HostedCheckout from "./routes/HostedCheckout.tsx";
import Success from "./routes/Success.tsx";
import Failure from "./routes/Failure.tsx";
function App() {
const router = createBrowserRouter([
{
path: "/",
element: (
<Home/>
),
},
{
path: "/hosted-checkout",
element: (
<HostedCheckout/>
)
},
{
path: '/success',
element: (
<Success/>
)
},
{
path: '/failure',
element: (
<Failure/>
)
},
]);
return (
<RouterProvider router={router}/>
)
}
export default App

這將確保 Success 和 Failure 元件分別在 /success/failure 路由上呈現。

至此,前臺設定完成。接下來,設定後端以建立 /checkout/hosted 端點。

構建後端

開啟後端專案,在 pom.xml 檔案的依賴關係陣列中新增以下幾行,安裝 Stripe SDK:

Plain text
Copy to clipboard
Open code in new window
EnlighterJS 3 Syntax Highlighter
<dependency>
<groupId>com.stripe</groupId>
<artifactId>stripe-java</artifactId>
<version>22.29.0</version>
</dependency>
<dependency> <groupId>com.stripe</groupId> <artifactId>stripe-java</artifactId> <version>22.29.0</version> </dependency>
        <dependency>
<groupId>com.stripe</groupId>
<artifactId>stripe-java</artifactId>
<version>22.29.0</version>
</dependency>

接下來,在專案中載入 Maven 更改以安裝依賴項。如果你的整合開發環境不支援通過使用者介面安裝,可執行 maven dependency:resolvemaven install 命令。如果沒有 maven CLI,可在建立專案時使用 Spring initializr 中的 mvnw 封裝器。

安裝好依賴項後,建立一個新的 REST 控制器來處理後端應用程式傳入的 HTTP 請求。為此,請在 src/main/java/com/kinsta/stripe-java/backend 目錄中建立 PaymentController.java 檔案,並新增以下程式碼:

Plain text
Copy to clipboard
Open code in new window
EnlighterJS 3 Syntax Highlighter
package com.kinsta.stripejava.backend;
import com.stripe.Stripe;
import com.stripe.exception.StripeException;
import com.stripe.model.Customer;
import com.stripe.model.Product;
import com.stripe.model.checkout.Session;
import com.stripe.param.checkout.SessionCreateParams;
import com.stripe.param.checkout.SessionCreateParams.LineItem.PriceData;
import org.springframework.web.bind.annotation.CrossOrigin;
import org.springframework.web.bind.annotation.PostMapping;
import org.springframework.web.bind.annotation.RequestBody;
import org.springframework.web.bind.annotation.RestController;
@RestController
@CrossOrigin
public class PaymentController {
String STRIPE_API_KEY = System.getenv().get("STRIPE_API_KEY");
@PostMapping("/checkout/hosted")
String hostedCheckout(@RequestBody RequestDTO requestDTO) throws StripeException {
return "Hello World!";
}
}
package com.kinsta.stripejava.backend; import com.stripe.Stripe; import com.stripe.exception.StripeException; import com.stripe.model.Customer; import com.stripe.model.Product; import com.stripe.model.checkout.Session; import com.stripe.param.checkout.SessionCreateParams; import com.stripe.param.checkout.SessionCreateParams.LineItem.PriceData; import org.springframework.web.bind.annotation.CrossOrigin; import org.springframework.web.bind.annotation.PostMapping; import org.springframework.web.bind.annotation.RequestBody; import org.springframework.web.bind.annotation.RestController; @RestController @CrossOrigin public class PaymentController { String STRIPE_API_KEY = System.getenv().get("STRIPE_API_KEY"); @PostMapping("/checkout/hosted") String hostedCheckout(@RequestBody RequestDTO requestDTO) throws StripeException { return "Hello World!"; } }
package com.kinsta.stripejava.backend;
import com.stripe.Stripe;
import com.stripe.exception.StripeException;
import com.stripe.model.Customer;
import com.stripe.model.Product;
import com.stripe.model.checkout.Session;
import com.stripe.param.checkout.SessionCreateParams;
import com.stripe.param.checkout.SessionCreateParams.LineItem.PriceData;
import org.springframework.web.bind.annotation.CrossOrigin;
import org.springframework.web.bind.annotation.PostMapping;
import org.springframework.web.bind.annotation.RequestBody;
import org.springframework.web.bind.annotation.RestController;
@RestController
@CrossOrigin
public class PaymentController {
String STRIPE_API_KEY = System.getenv().get("STRIPE_API_KEY");
@PostMapping("/checkout/hosted")
String hostedCheckout(@RequestBody RequestDTO requestDTO) throws StripeException {
return "Hello World!";
}
}

上面的程式碼匯入了 Stripe 的基本依賴項,並建立了 PaymentController 類。該類帶有兩個註解: @RestController@CrossOrigin@RestController 註解指示 Spring Boot 將該類視為控制器,其方法現在可以使用 @Mapping 註解來處理傳入的 HTTP 請求。

@CrossOrigin 註解將該類中定義的所有端點標記為根據 CORS 規則向所有起源開放。不過,由於各種網際網路域可能存在安全漏洞,因此在生產中不鼓勵採用這種做法。

為了達到最佳效果,建議將後端和前端伺服器託管在同一域名上,以規避 CORS 問題。如果不可行,也可以使用 @CrossOrigin 註解指定前端客戶端(向後端伺服器傳送請求)的域,如下所示:

Plain text
Copy to clipboard
Open code in new window
EnlighterJS 3 Syntax Highlighter
@CrossOrigin(origins = "http://frontend.com")

PaymentController 類將從環境變數中提取 Stripe API 金鑰,以便稍後提供給 Stripe SDK。執行應用程式時,必須通過環境變數嚮應用程式提供 Stripe API 金鑰。

在本地,你可以在系統中建立一個新的環境變數,可以是臨時性的(在啟動開發伺服器的命令前新增 KEY=VALUE 短語),也可以是永久性的(更新終端的配置檔案或在 Windows 的控制面板中設定環境變數)。

在生產環境中,部署提供商會為您提供一個單獨的選項來填寫應用程式使用的環境變數。

如果您使用的是 IntelliJ IDEA(或類似的整合開發環境),請單擊整合開發環境右上角的 “Run Configurations“,然後從開啟的下拉選單中單擊 “Edit Configurations…“選項,更新執行命令並設定環境變數。
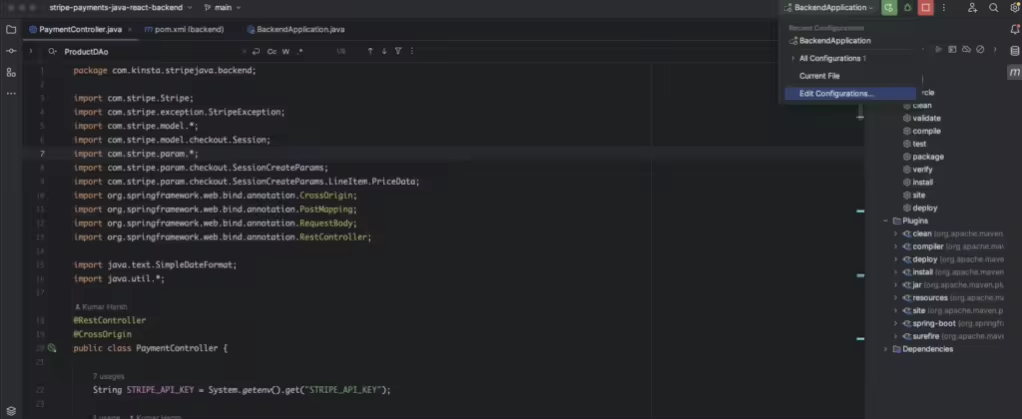
開啟執行/除錯配置對話方塊

開啟執行/除錯配置對話方塊

這將開啟一個對話方塊,您可以使用 Environment variables 欄位為應用程式提供環境變數。輸入環境變數 STRIPE_API_KEY ,格式為 VAR1=VALUE 。你可以在 Stripe Developers 網站上找到你的 API 金鑰。您必須從該頁面提供 Secret Key 的值。
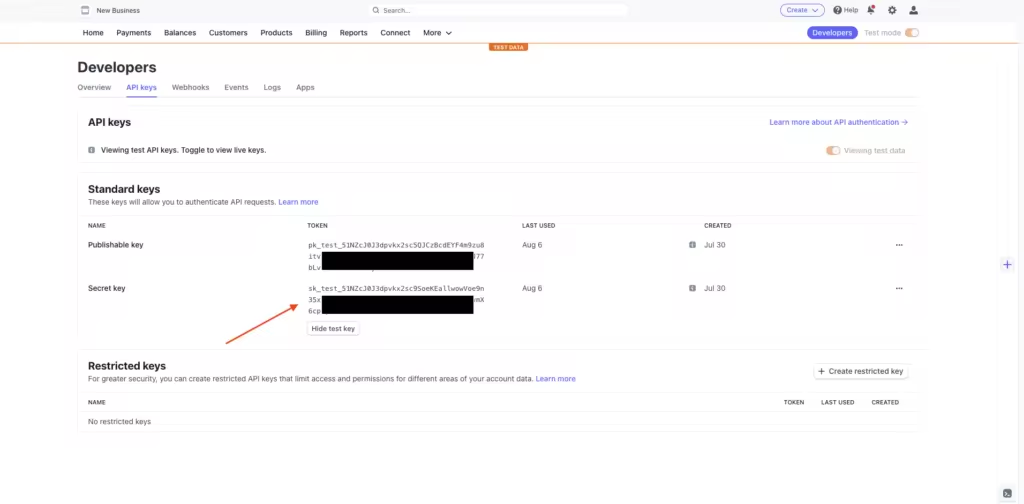
顯示 API 金鑰的 Stripe 面板

顯示 API 金鑰的 Stripe 面板

如果還沒有,請建立一個新的 Stripe 賬戶,以獲取 API 金鑰。

設定好 API 金鑰後,繼續建立端點。該端點將收集客戶資料(姓名和電子郵件),在 Stripe 中為他們建立一個客戶檔案(如果還不存在),並建立一個 Checkout Session (結賬會話),讓使用者為購物車中的物品付款。

以下是 hostedCheckout 方法的程式碼:

Plain text
Copy to clipboard
Open code in new window
EnlighterJS 3 Syntax Highlighter
@PostMapping("/checkout/hosted")
String hostedCheckout(@RequestBody RequestDTO requestDTO) throws StripeException {
Stripe.apiKey = STRIPE_API_KEY;
String clientBaseURL = System.getenv().get("CLIENT_BASE_URL");
// Start by finding an existing customer record from Stripe or creating a new one if needed
Customer customer = CustomerUtil.findOrCreateCustomer(requestDTO.getCustomerEmail(), requestDTO.getCustomerName());
// Next, create a checkout session by adding the details of the checkout
SessionCreateParams.Builder paramsBuilder =
SessionCreateParams.builder()
.setMode(SessionCreateParams.Mode.PAYMENT)
.setCustomer(customer.getId())
.setSuccessUrl(clientBaseURL + "/success?session_id={CHECKOUT_SESSION_ID}")
.setCancelUrl(clientBaseURL + "/failure");
for (Product product : requestDTO.getItems()) {
paramsBuilder.addLineItem(
SessionCreateParams.LineItem.builder()
.setQuantity(1L)
.setPriceData(
PriceData.builder()
.setProductData(
PriceData.ProductData.builder()
.putMetadata("app_id", product.getId())
.setName(product.getName())
.build()
)
.setCurrency(ProductDAO.getProduct(product.getId()).getDefaultPriceObject().getCurrency())
.setUnitAmountDecimal(ProductDAO.getProduct(product.getId()).getDefaultPriceObject().getUnitAmountDecimal())
.build())
.build());
}
}
Session session = Session.create(paramsBuilder.build());
return session.getUrl();
}
@PostMapping("/checkout/hosted") String hostedCheckout(@RequestBody RequestDTO requestDTO) throws StripeException { Stripe.apiKey = STRIPE_API_KEY; String clientBaseURL = System.getenv().get("CLIENT_BASE_URL"); // Start by finding an existing customer record from Stripe or creating a new one if needed Customer customer = CustomerUtil.findOrCreateCustomer(requestDTO.getCustomerEmail(), requestDTO.getCustomerName()); // Next, create a checkout session by adding the details of the checkout SessionCreateParams.Builder paramsBuilder = SessionCreateParams.builder() .setMode(SessionCreateParams.Mode.PAYMENT) .setCustomer(customer.getId()) .setSuccessUrl(clientBaseURL + "/success?session_id={CHECKOUT_SESSION_ID}") .setCancelUrl(clientBaseURL + "/failure"); for (Product product : requestDTO.getItems()) { paramsBuilder.addLineItem( SessionCreateParams.LineItem.builder() .setQuantity(1L) .setPriceData( PriceData.builder() .setProductData( PriceData.ProductData.builder() .putMetadata("app_id", product.getId()) .setName(product.getName()) .build() ) .setCurrency(ProductDAO.getProduct(product.getId()).getDefaultPriceObject().getCurrency()) .setUnitAmountDecimal(ProductDAO.getProduct(product.getId()).getDefaultPriceObject().getUnitAmountDecimal()) .build()) .build()); } } Session session = Session.create(paramsBuilder.build()); return session.getUrl(); }
    @PostMapping("/checkout/hosted")
String hostedCheckout(@RequestBody RequestDTO requestDTO) throws StripeException {
Stripe.apiKey = STRIPE_API_KEY;
String clientBaseURL = System.getenv().get("CLIENT_BASE_URL");
// Start by finding an existing customer record from Stripe or creating a new one if needed
Customer customer = CustomerUtil.findOrCreateCustomer(requestDTO.getCustomerEmail(), requestDTO.getCustomerName());
// Next, create a checkout session by adding the details of the checkout
SessionCreateParams.Builder paramsBuilder =
SessionCreateParams.builder()
.setMode(SessionCreateParams.Mode.PAYMENT)
.setCustomer(customer.getId())
.setSuccessUrl(clientBaseURL + "/success?session_id={CHECKOUT_SESSION_ID}")
.setCancelUrl(clientBaseURL + "/failure");
for (Product product : requestDTO.getItems()) {
paramsBuilder.addLineItem(
SessionCreateParams.LineItem.builder()
.setQuantity(1L)
.setPriceData(
PriceData.builder()
.setProductData(
PriceData.ProductData.builder()
.putMetadata("app_id", product.getId())
.setName(product.getName())
.build()
)
.setCurrency(ProductDAO.getProduct(product.getId()).getDefaultPriceObject().getCurrency())
.setUnitAmountDecimal(ProductDAO.getProduct(product.getId()).getDefaultPriceObject().getUnitAmountDecimal())
.build())
.build());
}
}
Session session = Session.create(paramsBuilder.build());
return session.getUrl();
}

在建立結賬會話時,程式碼會使用從客戶端收到的產品名稱,但不會使用請求中的價格詳情。這種方法避免了潛在的客戶端價格操縱,惡意行為者可能會在結賬請求中傳送降低的價格,從而以較低的價格購買產品和服務。

為防止這種情況,hostedCheckout 方法會查詢產品資料庫(通過 ProductDAO )以獲取正確的專案價格。

此外,Stripe 還按照生成器設計模式提供了各種 Builder 類。這些類有助於為 Stripe 請求建立引數物件。提供的程式碼片段還引用了環境變數來獲取客戶端應用程式的 URL。付款成功或失敗後,結賬會話物件要適當重定向,就必須使用該 URL。

要執行這段程式碼,請通過環境變數設定客戶端應用程式的 URL,與提供 Stripe API 金鑰的方式類似。由於客戶端應用是通過 Vite 執行的,因此本地應用 URL 應為 http://localhost:5173。請通過整合開發環境、終端或系統控制面板將其納入環境變數。

Plain text
Copy to clipboard
Open code in new window
EnlighterJS 3 Syntax Highlighter
CLIENT_BASE_URL=http://localhost:5173

此外,還要為應用程式提供 ProductDAO ,以便從中查詢產品價格。資料訪問物件(DAO)與資料來源(如資料庫)互動,以訪問與應用程式相關的資料。雖然建立產品資料庫不在本教學的範圍之內,但您可以做的一個簡單實現方法是在與 PaymentController.java 相同的目錄下新增一個新檔案 ProductDAO.java,並貼上以下程式碼:

Plain text
Copy to clipboard
Open code in new window
EnlighterJS 3 Syntax Highlighter
package com.kinsta.stripejava.backend;
import com.stripe.model.Price;
import com.stripe.model.Product;
import java.math.BigDecimal;
public class ProductDAO {
static Product[] products;
static {
products = new Product[4];
Product sampleProduct = new Product();
Price samplePrice = new Price();
sampleProduct.setName("Puma Shoes");
sampleProduct.setId("shoe");
samplePrice.setCurrency("usd");
samplePrice.setUnitAmountDecimal(BigDecimal.valueOf(2000));
sampleProduct.setDefaultPriceObject(samplePrice);
products[0] = sampleProduct;
sampleProduct = new Product();
samplePrice = new Price();
sampleProduct.setName("Nike Sliders");
sampleProduct.setId("slippers");
samplePrice.setCurrency("usd");
samplePrice.setUnitAmountDecimal(BigDecimal.valueOf(1000));
sampleProduct.setDefaultPriceObject(samplePrice);
products[1] = sampleProduct;
sampleProduct = new Product();
samplePrice = new Price();
sampleProduct.setName("Apple Music+");
sampleProduct.setId("music");
samplePrice.setCurrency("usd");
samplePrice.setUnitAmountDecimal(BigDecimal.valueOf(499));
sampleProduct.setDefaultPriceObject(samplePrice);
products[2] = sampleProduct;
}
public static Product getProduct(String id) {
if ("shoe".equals(id)) {
return products[0];
} else if ("slippers".equals(id)) {
return products[1];
} else if ("music".equals(id)) {
return products[2];
} else return new Product();
}
}
package com.kinsta.stripejava.backend; import com.stripe.model.Price; import com.stripe.model.Product; import java.math.BigDecimal; public class ProductDAO { static Product[] products; static { products = new Product[4]; Product sampleProduct = new Product(); Price samplePrice = new Price(); sampleProduct.setName("Puma Shoes"); sampleProduct.setId("shoe"); samplePrice.setCurrency("usd"); samplePrice.setUnitAmountDecimal(BigDecimal.valueOf(2000)); sampleProduct.setDefaultPriceObject(samplePrice); products[0] = sampleProduct; sampleProduct = new Product(); samplePrice = new Price(); sampleProduct.setName("Nike Sliders"); sampleProduct.setId("slippers"); samplePrice.setCurrency("usd"); samplePrice.setUnitAmountDecimal(BigDecimal.valueOf(1000)); sampleProduct.setDefaultPriceObject(samplePrice); products[1] = sampleProduct; sampleProduct = new Product(); samplePrice = new Price(); sampleProduct.setName("Apple Music+"); sampleProduct.setId("music"); samplePrice.setCurrency("usd"); samplePrice.setUnitAmountDecimal(BigDecimal.valueOf(499)); sampleProduct.setDefaultPriceObject(samplePrice); products[2] = sampleProduct; } public static Product getProduct(String id) { if ("shoe".equals(id)) { return products[0]; } else if ("slippers".equals(id)) { return products[1]; } else if ("music".equals(id)) { return products[2]; } else return new Product(); } }
package com.kinsta.stripejava.backend;
import com.stripe.model.Price;
import com.stripe.model.Product;
import java.math.BigDecimal;
public class ProductDAO {
static Product[] products;
static {
products = new Product[4];
Product sampleProduct = new Product();
Price samplePrice = new Price();
sampleProduct.setName("Puma Shoes");
sampleProduct.setId("shoe");
samplePrice.setCurrency("usd");
samplePrice.setUnitAmountDecimal(BigDecimal.valueOf(2000));
sampleProduct.setDefaultPriceObject(samplePrice);
products[0] = sampleProduct;
sampleProduct = new Product();
samplePrice = new Price();
sampleProduct.setName("Nike Sliders");
sampleProduct.setId("slippers");
samplePrice.setCurrency("usd");
samplePrice.setUnitAmountDecimal(BigDecimal.valueOf(1000));
sampleProduct.setDefaultPriceObject(samplePrice);
products[1] = sampleProduct;
sampleProduct = new Product();
samplePrice = new Price();
sampleProduct.setName("Apple Music+");
sampleProduct.setId("music");
samplePrice.setCurrency("usd");
samplePrice.setUnitAmountDecimal(BigDecimal.valueOf(499));
sampleProduct.setDefaultPriceObject(samplePrice);
products[2] = sampleProduct;
}
public static Product getProduct(String id) {
if ("shoe".equals(id)) {
return products[0];
} else if ("slippers".equals(id)) {
return products[1];
} else if ("music".equals(id)) {
return products[2];
} else return new Product();
}
}

這將初始化一個產品陣列,並允許您使用其識別符號 (ID) 查詢產品資料。您還需要建立一個 DTO(資料傳輸物件),以便 Spring Boot 自動序列化從客戶端傳入的有效載荷,併為您提供一個簡單的物件來訪問資料。為此,請建立一個新檔案 RequestDTO.java,並貼上以下程式碼:

Plain text
Copy to clipboard
Open code in new window
EnlighterJS 3 Syntax Highlighter
package com.kinsta.stripejava.backend;
import com.stripe.model.Product;
public class RequestDTO {
Product[] items;
String customerName;
String customerEmail;
public Product[] getItems() {
return items;
}
public String getCustomerName() {
return customerName;
}
public String getCustomerEmail() {
return customerEmail;
}
}
package com.kinsta.stripejava.backend; import com.stripe.model.Product; public class RequestDTO { Product[] items; String customerName; String customerEmail; public Product[] getItems() { return items; } public String getCustomerName() { return customerName; } public String getCustomerEmail() { return customerEmail; } }
package com.kinsta.stripejava.backend;
import com.stripe.model.Product;
public class RequestDTO {
Product[] items;
String customerName;
String customerEmail;
public Product[] getItems() {
return items;
}
public String getCustomerName() {
return customerName;
}
public String getCustomerEmail() {
return customerEmail;
}
}

該檔案定義了一個 POJO,其中包含客戶姓名、電子郵件和他們結賬的專案列表。

最後,實現 CustomerUtil.findOrCreateCustomer() 方法,以便在 Stripe 中建立尚未存在的客戶物件。為此,請建立一個名為 CustomerUtil 的檔案,並新增以下程式碼:

Plain text
Copy to clipboard
Open code in new window
EnlighterJS 3 Syntax Highlighter
package com.kinsta.stripejava.backend;
import com.stripe.exception.StripeException;
import com.stripe.model.Customer;
import com.stripe.model.CustomerSearchResult;
import com.stripe.param.CustomerCreateParams;
import com.stripe.param.CustomerSearchParams;
public class CustomerUtil {
public static Customer findCustomerByEmail(String email) throws StripeException {
CustomerSearchParams params =
CustomerSearchParams
.builder()
.setQuery("email:'" + email + "'")
.build();
CustomerSearchResult result = Customer.search(params);
return result.getData().size() > 0 ? result.getData().get(0) : null;
}
public static Customer findOrCreateCustomer(String email, String name) throws StripeException {
CustomerSearchParams params =
CustomerSearchParams
.builder()
.setQuery("email:'" + email + "'")
.build();
CustomerSearchResult result = Customer.search(params);
Customer customer;
// If no existing customer was found, create a new record
if (result.getData().size() == 0) {
CustomerCreateParams customerCreateParams = CustomerCreateParams.builder()
.setName(name)
.setEmail(email)
.build();
customer = Customer.create(customerCreateParams);
} else {
customer = result.getData().get(0);
}
return customer;
}
}
package com.kinsta.stripejava.backend; import com.stripe.exception.StripeException; import com.stripe.model.Customer; import com.stripe.model.CustomerSearchResult; import com.stripe.param.CustomerCreateParams; import com.stripe.param.CustomerSearchParams; public class CustomerUtil { public static Customer findCustomerByEmail(String email) throws StripeException { CustomerSearchParams params = CustomerSearchParams .builder() .setQuery("email:'" + email + "'") .build(); CustomerSearchResult result = Customer.search(params); return result.getData().size() > 0 ? result.getData().get(0) : null; } public static Customer findOrCreateCustomer(String email, String name) throws StripeException { CustomerSearchParams params = CustomerSearchParams .builder() .setQuery("email:'" + email + "'") .build(); CustomerSearchResult result = Customer.search(params); Customer customer; // If no existing customer was found, create a new record if (result.getData().size() == 0) { CustomerCreateParams customerCreateParams = CustomerCreateParams.builder() .setName(name) .setEmail(email) .build(); customer = Customer.create(customerCreateParams); } else { customer = result.getData().get(0); } return customer; } }
package com.kinsta.stripejava.backend;
import com.stripe.exception.StripeException;
import com.stripe.model.Customer;
import com.stripe.model.CustomerSearchResult;
import com.stripe.param.CustomerCreateParams;
import com.stripe.param.CustomerSearchParams;
public class CustomerUtil {
public static Customer findCustomerByEmail(String email) throws StripeException {
CustomerSearchParams params =
CustomerSearchParams
.builder()
.setQuery("email:'" + email + "'")
.build();
CustomerSearchResult result = Customer.search(params);
return result.getData().size() > 0 ? result.getData().get(0) : null;
}
public static Customer findOrCreateCustomer(String email, String name) throws StripeException {
CustomerSearchParams params =
CustomerSearchParams
.builder()
.setQuery("email:'" + email + "'")
.build();
CustomerSearchResult result = Customer.search(params);
Customer customer;
// If no existing customer was found, create a new record
if (result.getData().size() == 0) {
CustomerCreateParams customerCreateParams = CustomerCreateParams.builder()
.setName(name)
.setEmail(email)
.build();
customer = Customer.create(customerCreateParams);
} else {
customer = result.getData().get(0);
}
return customer;
}
}

該類還包含另一個方法 findCustomerByEmail ,可以使用電子郵件地址在 Stripe 中查詢客戶。客戶搜尋 API 用於查詢 Stripe 資料庫中的客戶記錄,而客戶建立 API 則用於根據需要建立客戶記錄。

這樣,託管結賬流程所需的後臺設定就完成了。現在,您可以在整合開發環境或獨立終端中執行前端和後端應用程式來測試應用程式。下面是成功流程的樣子:
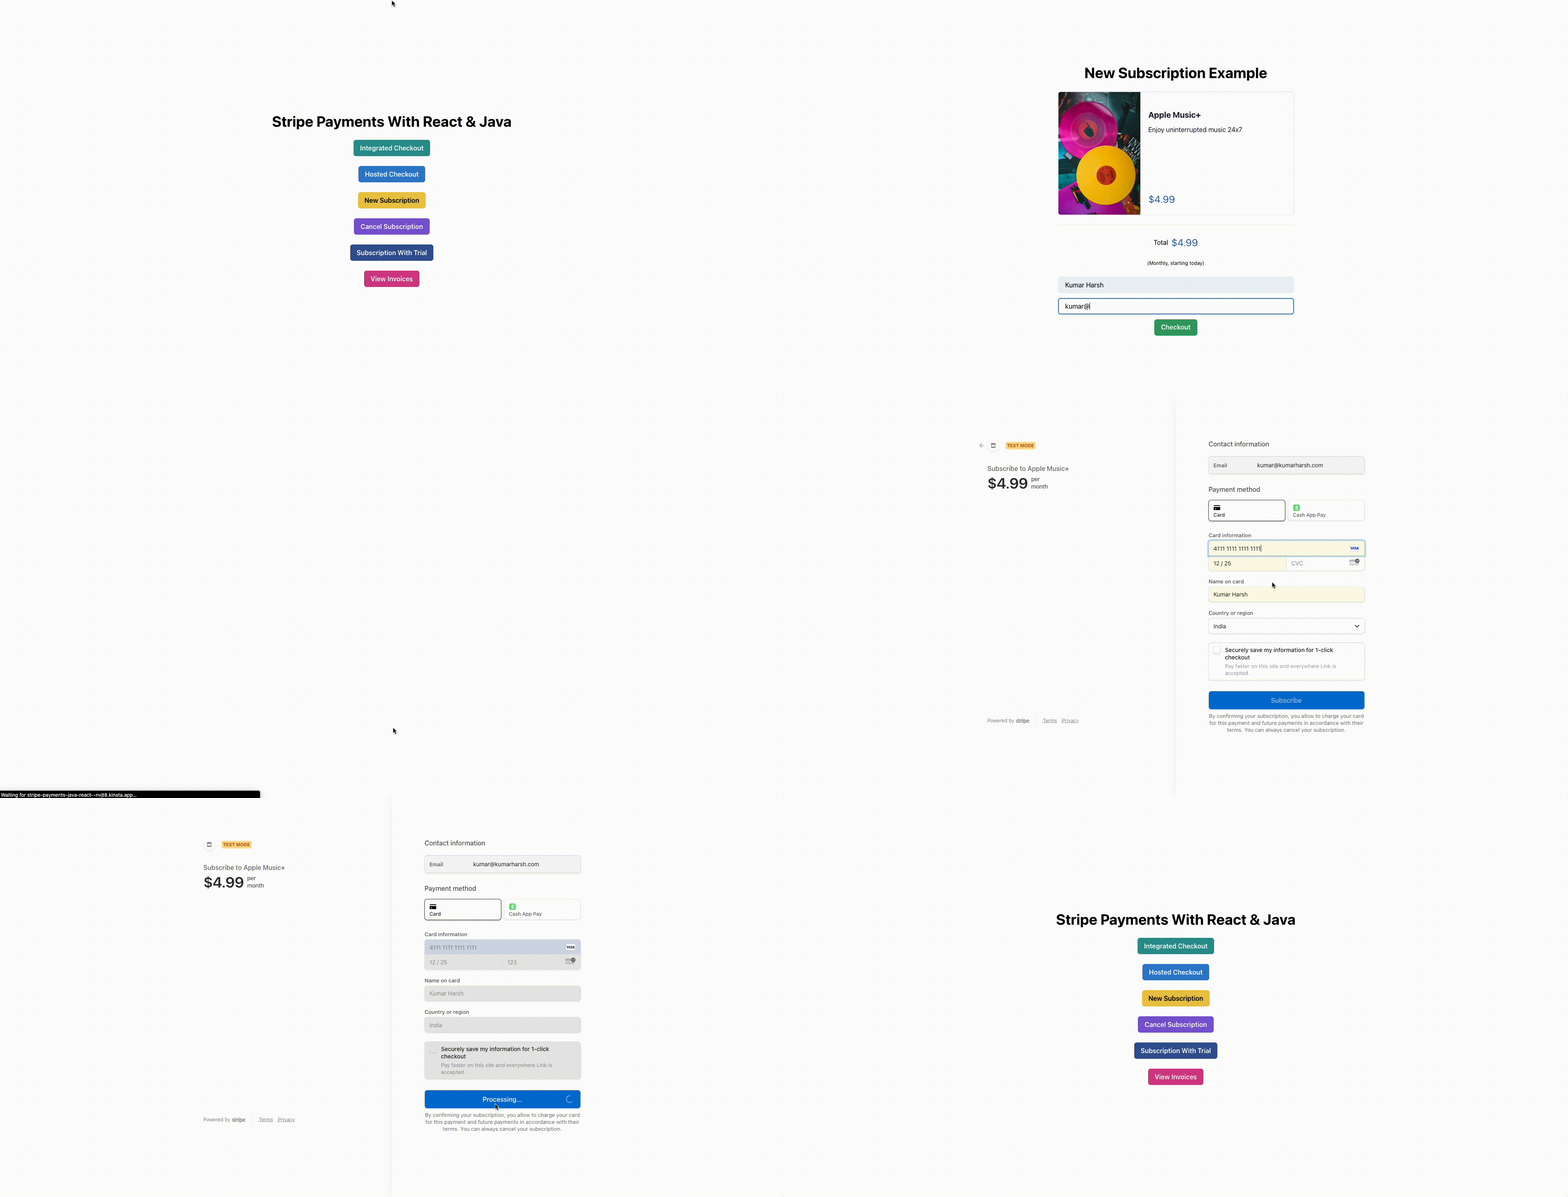
成功的託管結賬流程

成功的託管結賬流程

在測試 Stripe 整合時,您可以使用以下銀行卡詳細資訊來模擬銀行卡交易:

    • Card Number: 4111 1111 1111 1111
  • Expiry Month & Year: 12 / 25
  • CVV: 任何三位數字
  • Name on Card: Any Name

如果您選擇取消交易而不是付款,失敗流程如下:
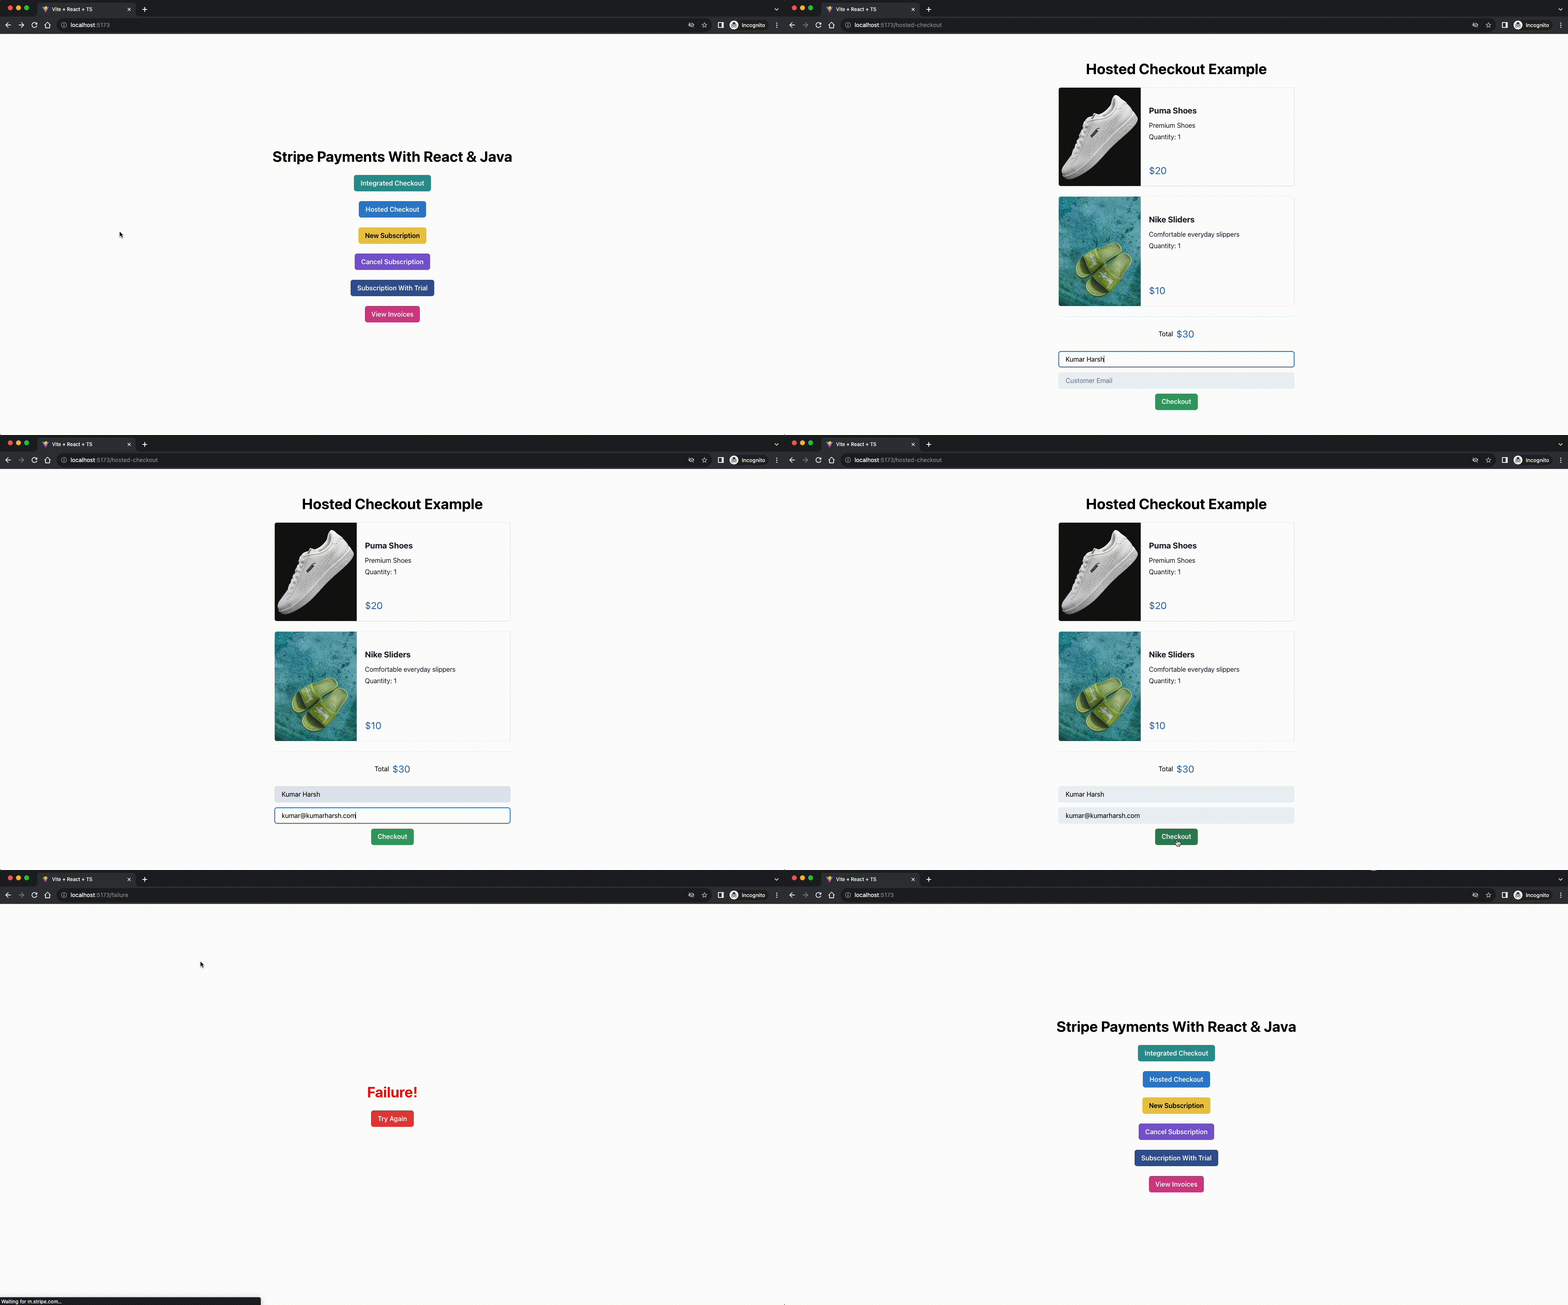
失敗的託管結賬流程

失敗的託管結賬流程

這就完成了在應用程式中內建 Stripe 託管結賬體驗的設定。您可以檢視 Stripe 文件,進一步瞭解如何自定義結賬頁面、收集客戶的更多詳細資訊等。

整合結賬

整合結賬體驗是指構建一個支付流程,它不會將使用者重定向到應用程式之外(就像在託管結賬流程中那樣),而是在應用程式中顯示支付表單。

打造整合結賬體驗意味著要處理客戶的支付詳情,這涉及到信用卡號、Google Pay ID 等敏感資訊。並非所有應用程式都能安全地處理這些資料。

為了減輕滿足 PCI-DSS 等標準的負擔,Stripe 提供了一些元素,您可以在應用程式中使用這些元素來收集支付詳情,同時還可以讓 Stripe 管理安全問題,並在其端安全地處理支付。

構建前端

首先,在前端應用程式中安裝 Stripe React SDK,在前端目錄下執行以下命令即可訪問 Stripe 元素:

Plain text
Copy to clipboard
Open code in new window
EnlighterJS 3 Syntax Highlighter
npm i @stripe/react-stripe-js @stripe/stripe-js

接下來,在 frontend/src/routes 目錄中新建一個名為 IntegratedCheckout.tsx 的檔案,並儲存以下程式碼:

Plain text
Copy to clipboard
Open code in new window
EnlighterJS 3 Syntax Highlighter
import {Button, Center, Heading, Input, VStack} from "@chakra-ui/react";
import {useEffect, useState} from "react";
import CartItem, {ItemData} from "../components/CartItem.tsx";
import TotalFooter from "../components/TotalFooter.tsx";
import {Products} from '../data.ts'
import {Elements, PaymentElement, useElements, useStripe} from '@stripe/react-stripe-js';
import {loadStripe, Stripe} from '@stripe/stripe-js';
function IntegratedCheckout() {
const [items] = useState<ItemData[]>(Products)
const [transactionClientSecret, setTransactionClientSecret] = useState("")
const [stripePromise, setStripePromise] = useState<Promise<Stripe | null> | null>(null)
const [name, setName] = useState("")
const [email, setEmail] = useState("")
const onCustomerNameChange = (ev: React.ChangeEvent<HTMLInputElement>) => {
setName(ev.target.value)
}
const onCustomerEmailChange = (ev: React.ChangeEvent<HTMLInputElement>) => {
setEmail(ev.target.value)
}
useEffect(() => {
// Make sure to call `loadStripe` outside of a component’s render to avoid
// recreating the `Stripe` object on every render.
setStripePromise(loadStripe(process.env.VITE_STRIPE_API_KEY || ""));
}, [])
const createTransactionSecret = () => {
fetch(process.env.VITE_SERVER_BASE_URL + "/checkout/integrated", {
method: "POST",
headers: {'Content-Type': 'application/json'},
body: JSON.stringify({
items: items.map(elem => ({name: elem.name, id: elem.id})),
customerName: name,
customerEmail: email,
})
})
.then(r => r.text())
.then(r => {
setTransactionClientSecret(r)
})
}
return <>
<Center h={'100vh'} color='black'>
<VStack spacing='24px'>
<Heading>Integrated Checkout Example</Heading>
{items.map(elem => {
return <CartItem data={elem} mode={'checkout'}/>
})}
<TotalFooter total={30} mode={"checkout"}/>
<Input variant='filled' placeholder='Customer Name' onChange={onCustomerNameChange}
value={name}/>
<Input variant='filled' placeholder='Customer Email' onChange={onCustomerEmailChange}
value={email}/>
<Button onClick={createTransactionSecret} colorScheme={'green'}>Initiate Payment</Button>
{(transactionClientSecret === "" ?
<></>
: <Elements stripe={stripePromise} options={{clientSecret: transactionClientSecret}}>
<CheckoutForm/>
</Elements>)}
</VStack>
</Center>
</>
}
const CheckoutForm = () => {
const stripe = useStripe();
const elements = useElements();
const handleSubmit = async (event: React.MouseEvent<HTMLButtonElement>) => {
event.preventDefault();
if (!stripe || !elements) {
return;
}
const result = await stripe.confirmPayment({
elements,
confirmParams: {
return_url: process.env.VITE_CLIENT_BASE_URL + "/success",
},
});
if (result.error) {
console.log(result.error.message);
}
};
return <>
<VStack>
<PaymentElement/>
<Button colorScheme={'green'} disabled={!stripe} onClick={handleSubmit}>Pay</Button>
</VStack>
</>
}
export default IntegratedCheckout
import {Button, Center, Heading, Input, VStack} from "@chakra-ui/react"; import {useEffect, useState} from "react"; import CartItem, {ItemData} from "../components/CartItem.tsx"; import TotalFooter from "../components/TotalFooter.tsx"; import {Products} from '../data.ts' import {Elements, PaymentElement, useElements, useStripe} from '@stripe/react-stripe-js'; import {loadStripe, Stripe} from '@stripe/stripe-js'; function IntegratedCheckout() { const [items] = useState<ItemData[]>(Products) const [transactionClientSecret, setTransactionClientSecret] = useState("") const [stripePromise, setStripePromise] = useState<Promise<Stripe | null> | null>(null) const [name, setName] = useState("") const [email, setEmail] = useState("") const onCustomerNameChange = (ev: React.ChangeEvent<HTMLInputElement>) => { setName(ev.target.value) } const onCustomerEmailChange = (ev: React.ChangeEvent<HTMLInputElement>) => { setEmail(ev.target.value) } useEffect(() => { // Make sure to call `loadStripe` outside of a component’s render to avoid // recreating the `Stripe` object on every render. setStripePromise(loadStripe(process.env.VITE_STRIPE_API_KEY || "")); }, []) const createTransactionSecret = () => { fetch(process.env.VITE_SERVER_BASE_URL + "/checkout/integrated", { method: "POST", headers: {'Content-Type': 'application/json'}, body: JSON.stringify({ items: items.map(elem => ({name: elem.name, id: elem.id})), customerName: name, customerEmail: email, }) }) .then(r => r.text()) .then(r => { setTransactionClientSecret(r) }) } return <> <Center h={'100vh'} color='black'> <VStack spacing='24px'> <Heading>Integrated Checkout Example</Heading> {items.map(elem => { return <CartItem data={elem} mode={'checkout'}/> })} <TotalFooter total={30} mode={"checkout"}/> <Input variant='filled' placeholder='Customer Name' onChange={onCustomerNameChange} value={name}/> <Input variant='filled' placeholder='Customer Email' onChange={onCustomerEmailChange} value={email}/> <Button onClick={createTransactionSecret} colorScheme={'green'}>Initiate Payment</Button> {(transactionClientSecret === "" ? <></> : <Elements stripe={stripePromise} options={{clientSecret: transactionClientSecret}}> <CheckoutForm/> </Elements>)} </VStack> </Center> </> } const CheckoutForm = () => { const stripe = useStripe(); const elements = useElements(); const handleSubmit = async (event: React.MouseEvent<HTMLButtonElement>) => { event.preventDefault(); if (!stripe || !elements) { return; } const result = await stripe.confirmPayment({ elements, confirmParams: { return_url: process.env.VITE_CLIENT_BASE_URL + "/success", }, }); if (result.error) { console.log(result.error.message); } }; return <> <VStack> <PaymentElement/> <Button colorScheme={'green'} disabled={!stripe} onClick={handleSubmit}>Pay</Button> </VStack> </> } export default IntegratedCheckout
import {Button, Center, Heading, Input, VStack} from "@chakra-ui/react";
import {useEffect, useState} from "react";
import CartItem, {ItemData} from "../components/CartItem.tsx";
import TotalFooter from "../components/TotalFooter.tsx";
import {Products} from '../data.ts'
import {Elements, PaymentElement, useElements, useStripe} from '@stripe/react-stripe-js';
import {loadStripe, Stripe} from '@stripe/stripe-js';
function IntegratedCheckout() {
const [items] = useState<ItemData[]>(Products)
const [transactionClientSecret, setTransactionClientSecret] = useState("")
const [stripePromise, setStripePromise] = useState<Promise<Stripe | null> | null>(null)
const [name, setName] = useState("")
const [email, setEmail] = useState("")
const onCustomerNameChange = (ev: React.ChangeEvent<HTMLInputElement>) => {
setName(ev.target.value)
}
const onCustomerEmailChange = (ev: React.ChangeEvent<HTMLInputElement>) => {
setEmail(ev.target.value)
}
useEffect(() => {
// Make sure to call `loadStripe` outside of a component’s render to avoid
// recreating the `Stripe` object on every render.
setStripePromise(loadStripe(process.env.VITE_STRIPE_API_KEY || ""));
}, [])
const createTransactionSecret = () => {
fetch(process.env.VITE_SERVER_BASE_URL + "/checkout/integrated", {
method: "POST",
headers: {'Content-Type': 'application/json'},
body: JSON.stringify({
items: items.map(elem => ({name: elem.name, id: elem.id})),
customerName: name,
customerEmail: email,
})
})
.then(r => r.text())
.then(r => {
setTransactionClientSecret(r)
})
}
return <>
<Center h={'100vh'} color='black'>
<VStack spacing='24px'>
<Heading>Integrated Checkout Example</Heading>
{items.map(elem => {
return <CartItem data={elem} mode={'checkout'}/>
})}
<TotalFooter total={30} mode={"checkout"}/>
<Input variant='filled' placeholder='Customer Name' onChange={onCustomerNameChange}
value={name}/>
<Input variant='filled' placeholder='Customer Email' onChange={onCustomerEmailChange}
value={email}/>
<Button onClick={createTransactionSecret} colorScheme={'green'}>Initiate Payment</Button>
{(transactionClientSecret === "" ?
<></>
: <Elements stripe={stripePromise} options={{clientSecret: transactionClientSecret}}>
<CheckoutForm/>
</Elements>)}
</VStack>
</Center>
</>
}
const CheckoutForm = () => {
const stripe = useStripe();
const elements = useElements();
const handleSubmit = async (event: React.MouseEvent<HTMLButtonElement>) => {
event.preventDefault();
if (!stripe || !elements) {
return;
}
const result = await stripe.confirmPayment({
elements,
confirmParams: {
return_url: process.env.VITE_CLIENT_BASE_URL + "/success",
},
});
if (result.error) {
console.log(result.error.message);
}
};
return <>
<VStack>
<PaymentElement/>
<Button colorScheme={'green'} disabled={!stripe} onClick={handleSubmit}>Pay</Button>
</VStack>
</>
}
export default IntegratedCheckout

該檔案定義了兩個元件: IntegratedCheckout CheckoutFormCheckoutForm 定義了一個簡單的表單,其中包含一個來自 Stripe 的 PaymentElement (用於收集客戶的付款詳細資訊)和一個 Pay(用於觸發收款請求)按鈕。

該元件還呼叫了 useStripe()useElements() 鉤子,以建立一個 Stripe SDK 例項,用於建立付款請求。一旦點選 Pay 按鈕,Stripe SDK 中的 stripe.confirmPayment() 方法就會被呼叫,該方法會從元素例項中收集使用者的支付資料,並將其傳送到 Stripe 後臺,如果交易成功,還會重定向到一個成功 URL。

結賬表單與頁面的其他部分是分開的,因為需要在 Elements 提供程式的上下文中呼叫 useStripe()useElements() 鉤子,這已在 IntegratedCheckout 的返回語句中完成。如果將 Stripe 掛鉤呼叫直接移至 IntegratedCheckout 元件,它們就會超出 Elements 提供程式的範圍,從而無法執行。

IntegratedCheckout 元件重複使用 CartItem TotalFooter 元件來顯示購物車中的專案和總金額。它還顯示了兩個用於收集客戶資訊的輸入欄位和一個 Initiate payment 按鈕,該按鈕會向 Java 後端伺服器傳送請求,以便使用客戶和購物車詳細資訊建立客戶密匙。收到客戶密匙後,就會顯示 CheckoutForm,處理收集客戶付款資訊的工作。

除此之外,useEffect 用於呼叫 loadStripe 方法。該效果只在元件渲染時執行一次,這樣在更新元件內部狀態時就不會多次載入 Stripe SDK。

要執行上述程式碼,您還需要在前端專案中新增兩個新的環境變數: VITE_STRIPE_API_KEYVITE_CLIENT_BASE_URL。Stripe API 金鑰變數將儲存來自 Stripe 面板的可釋出 API 金鑰,而客戶端基礎 URL 變數將包含客戶端應用程式(即前端應用程式本身)的連結,以便將其傳遞給 Stripe SDK,用於處理成功和失敗重定向。

為此,請在前臺目錄下的 .env 檔案中新增以下程式碼:

Plain text
Copy to clipboard
Open code in new window
EnlighterJS 3 Syntax Highlighter
VITE_STRIPE_API_KEY=pk_test_xxxxxxxxxx # Your key here
VITE_CLIENT_BASE_URL=http://localhost:5173
VITE_STRIPE_API_KEY=pk_test_xxxxxxxxxx # Your key here VITE_CLIENT_BASE_URL=http://localhost:5173
VITE_STRIPE_API_KEY=pk_test_xxxxxxxxxx # Your key here
VITE_CLIENT_BASE_URL=http://localhost:5173

最後,更新 App.tsx 檔案,在前端應用程式的 /integrated-checkout 路由中加入 IntegratedCheckout 元件。在 App 元件中傳給 createBrowserRouter 呼叫的陣列中新增以下程式碼:

Plain text
Copy to clipboard
Open code in new window
EnlighterJS 3 Syntax Highlighter
{
path: '/integrated-checkout',
element: (
<IntegratedCheckout/>
)
},
{ path: '/integrated-checkout', element: ( <IntegratedCheckout/> ) },
       {
path: '/integrated-checkout',
element: (
<IntegratedCheckout/>
)
},

至此,前端所需的設定就完成了。接下來,在後端伺服器上建立一個新路由,用於建立客戶端金鑰,以處理前端應用程式上的整合結賬會話。

構建後端

為了確保前端整合不會被攻擊者濫用(因為前端程式碼比後端更容易破解),Stripe 要求您在後端伺服器上生成唯一的客戶金鑰,並用後端生成的客戶金鑰驗證每個整合支付請求,以確保確實是您的應用程式在嘗試收款。為此,您需要在後臺設定另一條路徑,根據客戶和購物車資訊建立客戶金鑰。

為了在伺服器上建立客戶金鑰,請在 PaymentController 類中建立一個名為 integratedCheckout 的新方法,並儲存以下程式碼:

Plain text
Copy to clipboard
Open code in new window
EnlighterJS 3 Syntax Highlighter
@PostMapping("/checkout/integrated")
String integratedCheckout(@RequestBody RequestDTO requestDTO) throws StripeException {
Stripe.apiKey = STRIPE_API_KEY;
// Start by finding existing customer or creating a new one if needed
Customer customer = CustomerUtil.findOrCreateCustomer(requestDTO.getCustomerEmail(), requestDTO.getCustomerName());
// Create a PaymentIntent and send it's client secret to the client
PaymentIntentCreateParams params =
PaymentIntentCreateParams.builder()
.setAmount(Long.parseLong(calculateOrderAmount(requestDTO.getItems())))
.setCurrency("usd")
.setCustomer(customer.getId())
.setAutomaticPaymentMethods(
PaymentIntentCreateParams.AutomaticPaymentMethods
.builder()
.setEnabled(true)
.build()
)
.build();
PaymentIntent paymentIntent = PaymentIntent.create(params);
// Send the client secret from the payment intent to the client
return paymentIntent.getClientSecret();
}
@PostMapping("/checkout/integrated") String integratedCheckout(@RequestBody RequestDTO requestDTO) throws StripeException { Stripe.apiKey = STRIPE_API_KEY; // Start by finding existing customer or creating a new one if needed Customer customer = CustomerUtil.findOrCreateCustomer(requestDTO.getCustomerEmail(), requestDTO.getCustomerName()); // Create a PaymentIntent and send it's client secret to the client PaymentIntentCreateParams params = PaymentIntentCreateParams.builder() .setAmount(Long.parseLong(calculateOrderAmount(requestDTO.getItems()))) .setCurrency("usd") .setCustomer(customer.getId()) .setAutomaticPaymentMethods( PaymentIntentCreateParams.AutomaticPaymentMethods .builder() .setEnabled(true) .build() ) .build(); PaymentIntent paymentIntent = PaymentIntent.create(params); // Send the client secret from the payment intent to the client return paymentIntent.getClientSecret(); }
@PostMapping("/checkout/integrated")
String integratedCheckout(@RequestBody RequestDTO requestDTO) throws StripeException {
Stripe.apiKey = STRIPE_API_KEY;
// Start by finding existing customer or creating a new one if needed
Customer customer = CustomerUtil.findOrCreateCustomer(requestDTO.getCustomerEmail(), requestDTO.getCustomerName());
// Create a PaymentIntent and send it's client secret to the client
PaymentIntentCreateParams params =
PaymentIntentCreateParams.builder()
.setAmount(Long.parseLong(calculateOrderAmount(requestDTO.getItems())))
.setCurrency("usd")
.setCustomer(customer.getId())
.setAutomaticPaymentMethods(
PaymentIntentCreateParams.AutomaticPaymentMethods
.builder()
.setEnabled(true)
.build()
)
.build();
PaymentIntent paymentIntent = PaymentIntent.create(params);
// Send the client secret from the payment intent to the client
return paymentIntent.getClientSecret();
}

與使用構建器類(該類接受付款請求的配置)構建結賬會話的方式類似,整合結賬流程也要求您構建一個包含金額、貨幣和付款方式的付款會話。與結賬會話不同的是,除非建立發票,否則無法將細列專案與支付會話關聯起來,這一點您將在本教學後面的章節中學習。

由於您沒有將細列專案傳遞給結賬會話生成器,因此需要手動計算購物車專案的總金額,並將金額傳送到 Stripe 後臺。使用 ProductDAO 查詢並新增購物車中每個產品的價格。

為此,請定義一個新方法 calculateOrderAmount 並新增以下程式碼:

Plain text
Copy to clipboard
Open code in new window
EnlighterJS 3 Syntax Highlighter
static String calculateOrderAmount(Product[] items) {
long total = 0L;
for (Product item: items) {
// Look up the application database to find the prices for the products in the given list
total += ProductDAO.getProduct(item.getId()).getDefaultPriceObject().getUnitAmountDecimal().floatValue();
}
return String.valueOf(total);
}
static String calculateOrderAmount(Product[] items) { long total = 0L; for (Product item: items) { // Look up the application database to find the prices for the products in the given list total += ProductDAO.getProduct(item.getId()).getDefaultPriceObject().getUnitAmountDecimal().floatValue(); } return String.valueOf(total); }
     static String calculateOrderAmount(Product[] items) {
long total = 0L;
for (Product item: items) {
// Look up the application database to find the prices for the products in the given list
total += ProductDAO.getProduct(item.getId()).getDefaultPriceObject().getUnitAmountDecimal().floatValue();
}
return String.valueOf(total);
}

這樣就可以在前臺和後臺設定整合結賬流程了。您可以重新啟動伺服器和客戶端的開發伺服器,並在前端應用程式中試用新的整合結賬流程。下面是整合流程的外觀:
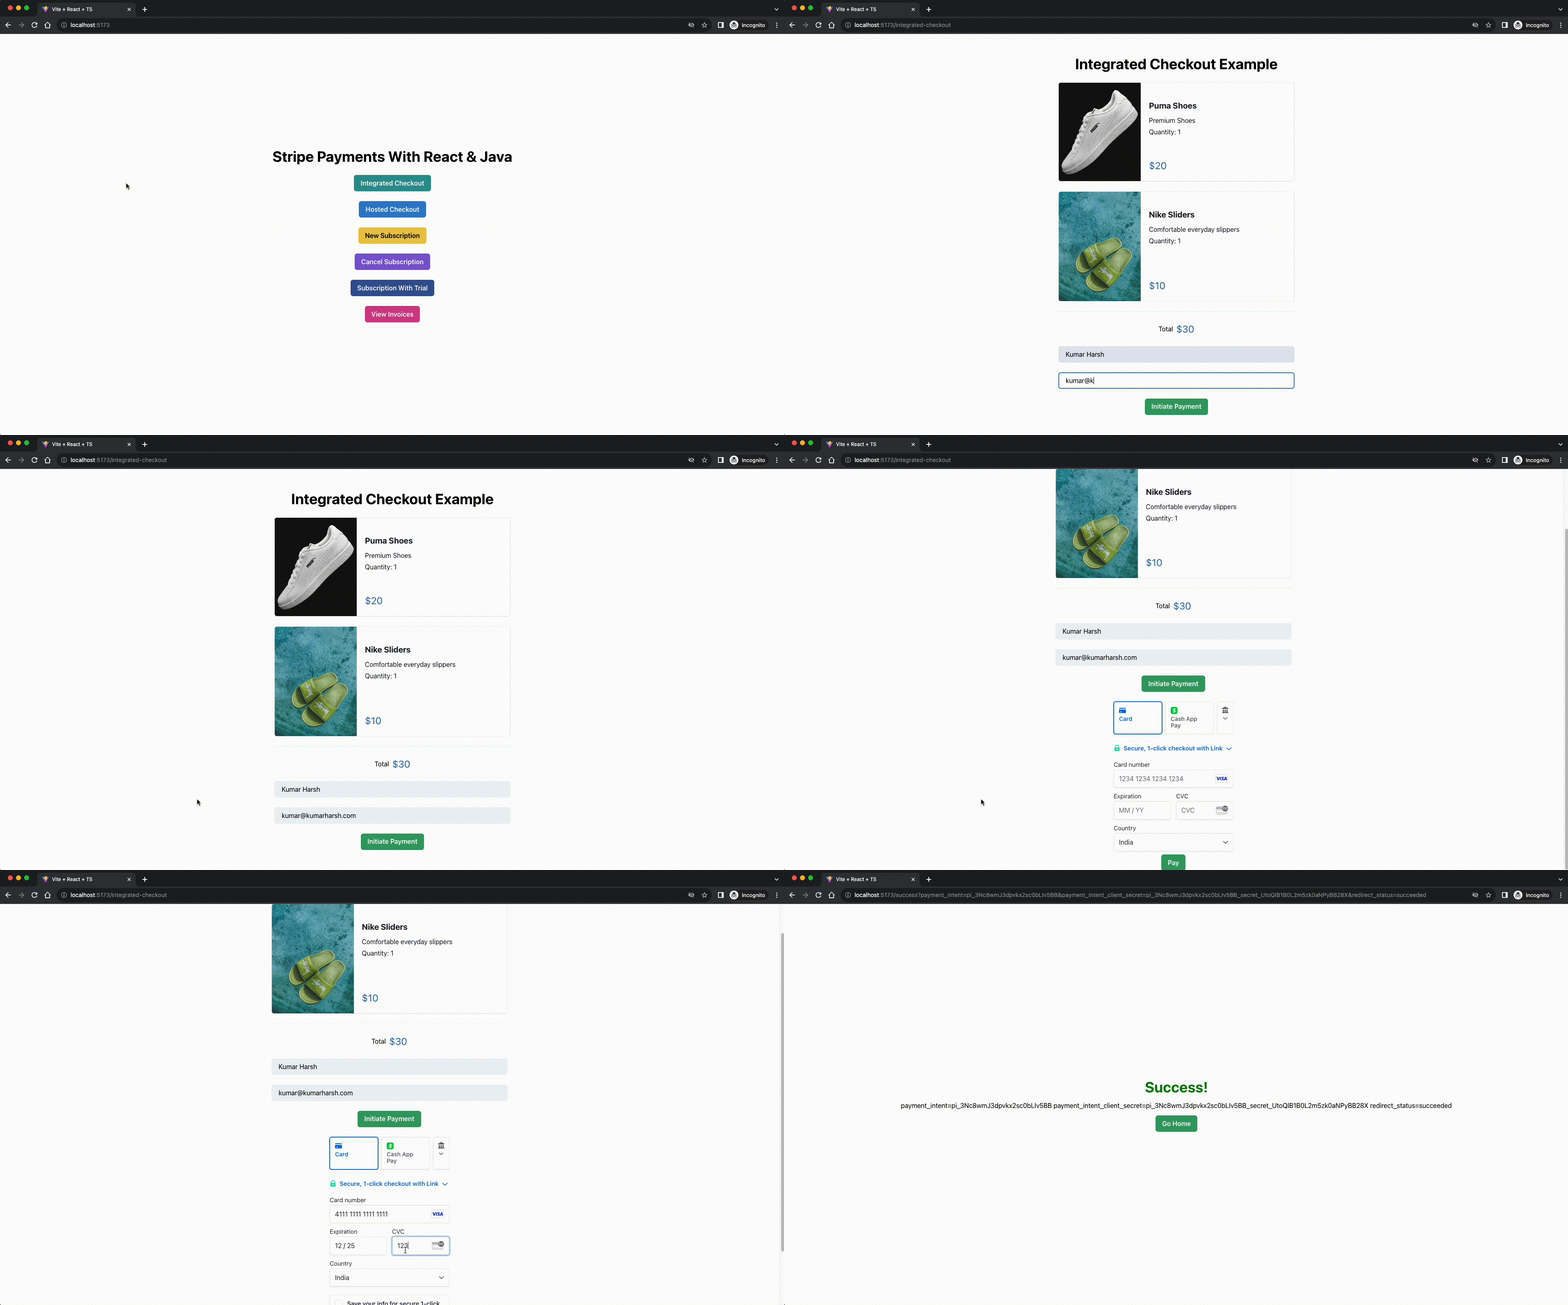
綜合結賬流程

綜合結賬流程

這就完成了應用程式中的基本整合結賬流程。現在,您可以進一步查閱 Stripe 文件,自定義支付方法或整合更多元件,以幫助您完成地址收集支付請求連結整合等其他操作!

為經常性服務設定訂閱

如今,網上商店提供的一種常見服務就是訂閱。無論您是要建立一個服務市場,還是要定期提供數字產品,與一次性購買相比,訂閱都是讓客戶以小額費用定期訪問您的服務的完美解決方案。

Stripe 可以幫助您輕鬆設定和取消訂閱。您還可以將免費試用作為訂閱的一部分,這樣使用者就可以在承諾使用之前試用您的產品。

設定新訂閱

使用託管結賬流程設定新訂閱非常簡單。您只需在構建結賬請求時更改幾個引數,然後建立一個新頁面(通過重複使用現有元件)來顯示新訂閱的結賬頁面。首先,在前端 components 資料夾中建立 NewSubscription.tsx 檔案。在其中貼上以下程式碼:

Plain text
Copy to clipboard
Open code in new window
EnlighterJS 3 Syntax Highlighter
import {Center, Heading, VStack} from "@chakra-ui/react";
import {useState} from "react";
import CartItem, {ItemData} from "../components/CartItem.tsx";
import TotalFooter from "../components/TotalFooter.tsx";
import CustomerDetails from "../components/CustomerDetails.tsx";
import {Subscriptions} from "../data.ts";
function NewSubscription() {
const [items] = useState<ItemData[]>(Subscriptions)
return <>
<Center h={'100vh'} color='black'>
<VStack spacing='24px'>
<Heading>New Subscription Example</Heading>
{items.map(elem => {
return <CartItem data={elem} mode={'subscription'}/>
})}
<TotalFooter total={4.99} mode={"subscription"}/>
<CustomerDetails data={items} endpoint={"/subscriptions/new"} />
</VStack>
</Center>
</>
}
export default NewSubscription
import {Center, Heading, VStack} from "@chakra-ui/react"; import {useState} from "react"; import CartItem, {ItemData} from "../components/CartItem.tsx"; import TotalFooter from "../components/TotalFooter.tsx"; import CustomerDetails from "../components/CustomerDetails.tsx"; import {Subscriptions} from "../data.ts"; function NewSubscription() { const [items] = useState<ItemData[]>(Subscriptions) return <> <Center h={'100vh'} color='black'> <VStack spacing='24px'> <Heading>New Subscription Example</Heading> {items.map(elem => { return <CartItem data={elem} mode={'subscription'}/> })} <TotalFooter total={4.99} mode={"subscription"}/> <CustomerDetails data={items} endpoint={"/subscriptions/new"} /> </VStack> </Center> </> } export default NewSubscription
import {Center, Heading, VStack} from "@chakra-ui/react";
import {useState} from "react";
import CartItem, {ItemData} from "../components/CartItem.tsx";
import TotalFooter from "../components/TotalFooter.tsx";
import CustomerDetails from "../components/CustomerDetails.tsx";
import {Subscriptions} from "../data.ts";
function NewSubscription() {
const [items] = useState<ItemData[]>(Subscriptions)
return <>
<Center h={'100vh'} color='black'>
<VStack spacing='24px'>
<Heading>New Subscription Example</Heading>
{items.map(elem => {
return <CartItem data={elem} mode={'subscription'}/>
})}
<TotalFooter total={4.99} mode={"subscription"}/>
<CustomerDetails data={items} endpoint={"/subscriptions/new"} />
</VStack>
</Center>
</>
}
export default NewSubscription

在上面的程式碼中,購物車資料取自 data.ts 檔案,其中只包含一個專案,以簡化流程。在實際應用中,您可以在一個訂閱訂單中包含多個專案。

要在正確的路由上呈現該元件,請在 App.tsx 元件中傳遞給 createBrowserRouter 呼叫的陣列中新增以下程式碼:

Plain text
Copy to clipboard
Open code in new window
EnlighterJS 3 Syntax Highlighter
{
path: '/new-subscription',
element: (
<NewSubscription/>
)
},
{ path: '/new-subscription', element: ( <NewSubscription/> ) },
       {
path: '/new-subscription',
element: (
<NewSubscription/>
)
},

至此,前端所需的設定全部完成。在後臺,建立新路由 /subscription/new ,為訂閱產品建立新的託管結賬會話。在 backend/src/main/java/com/kinsta/stripejava/backend 目錄中建立 newSubscription 方法,並儲存以下程式碼:

Plain text
Copy to clipboard
Open code in new window
EnlighterJS 3 Syntax Highlighter
@PostMapping("/subscriptions/new")
String newSubscription(@RequestBody RequestDTO requestDTO) throws StripeException {
Stripe.apiKey = STRIPE_API_KEY;
String clientBaseURL = System.getenv().get("CLIENT_BASE_URL");
// Start by finding existing customer record from Stripe or creating a new one if needed
Customer customer = CustomerUtil.findOrCreateCustomer(requestDTO.getCustomerEmail(), requestDTO.getCustomerName());
// Next, create a checkout session by adding the details of the checkout
SessionCreateParams.Builder paramsBuilder =
SessionCreateParams.builder()
// For subscriptions, you need to set the mode as subscription
.setMode(SessionCreateParams.Mode.SUBSCRIPTION)
.setCustomer(customer.getId())
.setSuccessUrl(clientBaseURL + "/success?session_id={CHECKOUT_SESSION_ID}")
.setCancelUrl(clientBaseURL + "/failure");
for (Product product : requestDTO.getItems()) {
paramsBuilder.addLineItem(
SessionCreateParams.LineItem.builder()
.setQuantity(1L)
.setPriceData(
PriceData.builder()
.setProductData(
PriceData.ProductData.builder()
.putMetadata("app_id", product.getId())
.setName(product.getName())
.build()
)
.setCurrency(ProductDAO.getProduct(product.getId()).getDefaultPriceObject().getCurrency())
.setUnitAmountDecimal(ProductDAO.getProduct(product.getId()).getDefaultPriceObject().getUnitAmountDecimal())
// For subscriptions, you need to provide the details on how often they would recur
.setRecurring(PriceData.Recurring.builder().setInterval(PriceData.Recurring.Interval.MONTH).build())
.build())
.build());
}
Session session = Session.create(paramsBuilder.build());
return session.getUrl();
}
@PostMapping("/subscriptions/new") String newSubscription(@RequestBody RequestDTO requestDTO) throws StripeException { Stripe.apiKey = STRIPE_API_KEY; String clientBaseURL = System.getenv().get("CLIENT_BASE_URL"); // Start by finding existing customer record from Stripe or creating a new one if needed Customer customer = CustomerUtil.findOrCreateCustomer(requestDTO.getCustomerEmail(), requestDTO.getCustomerName()); // Next, create a checkout session by adding the details of the checkout SessionCreateParams.Builder paramsBuilder = SessionCreateParams.builder() // For subscriptions, you need to set the mode as subscription .setMode(SessionCreateParams.Mode.SUBSCRIPTION) .setCustomer(customer.getId()) .setSuccessUrl(clientBaseURL + "/success?session_id={CHECKOUT_SESSION_ID}") .setCancelUrl(clientBaseURL + "/failure"); for (Product product : requestDTO.getItems()) { paramsBuilder.addLineItem( SessionCreateParams.LineItem.builder() .setQuantity(1L) .setPriceData( PriceData.builder() .setProductData( PriceData.ProductData.builder() .putMetadata("app_id", product.getId()) .setName(product.getName()) .build() ) .setCurrency(ProductDAO.getProduct(product.getId()).getDefaultPriceObject().getCurrency()) .setUnitAmountDecimal(ProductDAO.getProduct(product.getId()).getDefaultPriceObject().getUnitAmountDecimal()) // For subscriptions, you need to provide the details on how often they would recur .setRecurring(PriceData.Recurring.builder().setInterval(PriceData.Recurring.Interval.MONTH).build()) .build()) .build()); } Session session = Session.create(paramsBuilder.build()); return session.getUrl(); }
@PostMapping("/subscriptions/new")
String newSubscription(@RequestBody RequestDTO requestDTO) throws StripeException {
Stripe.apiKey = STRIPE_API_KEY;
String clientBaseURL = System.getenv().get("CLIENT_BASE_URL");
// Start by finding existing customer record from Stripe or creating a new one if needed
Customer customer = CustomerUtil.findOrCreateCustomer(requestDTO.getCustomerEmail(), requestDTO.getCustomerName());
// Next, create a checkout session by adding the details of the checkout
SessionCreateParams.Builder paramsBuilder =
SessionCreateParams.builder()
// For subscriptions, you need to set the mode as subscription
.setMode(SessionCreateParams.Mode.SUBSCRIPTION)
.setCustomer(customer.getId())
.setSuccessUrl(clientBaseURL + "/success?session_id={CHECKOUT_SESSION_ID}")
.setCancelUrl(clientBaseURL + "/failure");
for (Product product : requestDTO.getItems()) {
paramsBuilder.addLineItem(
SessionCreateParams.LineItem.builder()
.setQuantity(1L)
.setPriceData(
PriceData.builder()
.setProductData(
PriceData.ProductData.builder()
.putMetadata("app_id", product.getId())
.setName(product.getName())
.build()
)
.setCurrency(ProductDAO.getProduct(product.getId()).getDefaultPriceObject().getCurrency())
.setUnitAmountDecimal(ProductDAO.getProduct(product.getId()).getDefaultPriceObject().getUnitAmountDecimal())
// For subscriptions, you need to provide the details on how often they would recur
.setRecurring(PriceData.Recurring.builder().setInterval(PriceData.Recurring.Interval.MONTH).build())
.build())
.build());
}
Session session = Session.create(paramsBuilder.build());
return session.getUrl();
}

該方法中的程式碼與 hostedCheckout 方法中的程式碼非常相似,不同之處在於建立會話的模式是訂閱而不是產品,而且在建立會話之前,還要為訂閱的重複間隔設定一個值。

這指示 Stripe 將此結賬視為訂閱結賬,而不是一次性付款。與 hostedCheckout 方法類似,該方法也會將託管結賬頁面的 URL 作為 HTTP 響應返回給客戶端。客戶端將重定向到收到的 URL,以便客戶完成支付。

您可以重新啟動客戶端和伺服器的開發伺服器,檢視新訂閱頁面的執行情況。如下所示:

託管訂閱結賬流程

託管訂閱結賬流程

取消現有訂閱

既然知道了如何建立新訂閱,我們來學習如何讓客戶取消現有訂閱。由於本教學中構建的演示應用程式不包含任何身份驗證設定,因此請使用表單讓客戶輸入電子郵件以查詢其訂閱,然後為每個訂閱專案提供一個取消按鈕,以便使用者取消訂閱。

為此,您需要執行以下操作:

  1. 更新 CartItem 元件,以便在取消訂閱頁面上顯示取消按鈕。
  2. 建立一個 CancelSubscription 元件,首先顯示一個輸入框和一個按鈕,讓客戶使用其電子郵件地址搜尋訂閱,然後使用更新後的 CartItem 元件顯示訂閱列表。
  3. 在後臺伺服器中建立一個新方法,可以使用客戶的電子郵件地址從 Stripe 後臺查詢訂閱。
  4. 在後臺伺服器中建立一個新方法,該方法可以根據傳遞給它的訂閱 ID 取消訂閱。

首先更新 CartItem 元件,使其看起來像這樣:

Plain text
Copy to clipboard
Open code in new window
EnlighterJS 3 Syntax Highlighter
// Existing imports here
function CartItem(props: CartItemProps) {
// Add this hook call and the cancelSubscription method to cancel the selected subscription
const toast = useToast()
const cancelSubscription = () => {
fetch(process.env.VITE_SERVER_BASE_URL + "/subscriptions/cancel", {
method: "POST",
headers: {'Content-Type': 'application/json'},
body: JSON.stringify({
subscriptionId: props.data.stripeSubscriptionData?.subscriptionId
})
})
.then(r => r.text())
.then(() => {
toast({
title: 'Subscription cancelled.',
description: "We've cancelled your subscription for you.",
status: 'success',
duration: 9000,
isClosable: true,
})
if (props.onCancelled)
props.onCancelled()
})
}
return <Card direction={{base: 'column', sm: 'row'}}
overflow='hidden'
width={'xl'}
variant='outline'>
<Image
objectFit='cover'
maxW={{base: '100%', sm: '200px'}}
src={props.data.image}
/>
<Stack mt='6' spacing='3'>
<CardBody>
<VStack spacing={'3'} alignItems={"flex-start"}>
<Heading size='md'>{props.data.name}</Heading>
<VStack spacing={'1'} alignItems={"flex-start"}>
<Text>
{props.data.description}
</Text>
{(props.mode === "checkout" ? <Text>
{"Quantity: " + props.data.quantity}
</Text> : <></>)}
</VStack>
{/* <----------------------- Add this block ----------------------> */}
{(props.mode === "subscription" && props.data.stripeSubscriptionData ?
<VStack spacing={'1'} alignItems={"flex-start"}>
<Text>
{"Next Payment Date: " + props.data.stripeSubscriptionData.nextPaymentDate}
</Text>
<Text>
{"Subscribed On: " + props.data.stripeSubscriptionData.subscribedOn}
</Text>
{(props.data.stripeSubscriptionData.trialEndsOn ? <Text>
{"Free Trial Running Until: " + props.data.stripeSubscriptionData.trialEndsOn}
</Text> : <></>)}
</VStack> : <></>)}
</VStack>
</CardBody>
<CardFooter>
<VStack alignItems={'flex-start'}>
<Text color='blue.600' fontSize='2xl'>
{"$" + props.data.price}
</Text>
{/* <----------------------- Add this block ----------------------> */}
{(props.data.stripeSubscriptionData ?
<Button colorScheme={'red'} onClick={cancelSubscription}>Cancel Subscription</Button>
: <></>)}
</VStack>
</CardFooter>
</Stack>
</Card>
}
// Existing types here
export default CartItem
// Existing imports here function CartItem(props: CartItemProps) { // Add this hook call and the cancelSubscription method to cancel the selected subscription const toast = useToast() const cancelSubscription = () => { fetch(process.env.VITE_SERVER_BASE_URL + "/subscriptions/cancel", { method: "POST", headers: {'Content-Type': 'application/json'}, body: JSON.stringify({ subscriptionId: props.data.stripeSubscriptionData?.subscriptionId }) }) .then(r => r.text()) .then(() => { toast({ title: 'Subscription cancelled.', description: "We've cancelled your subscription for you.", status: 'success', duration: 9000, isClosable: true, }) if (props.onCancelled) props.onCancelled() }) } return <Card direction={{base: 'column', sm: 'row'}} overflow='hidden' width={'xl'} variant='outline'> <Image objectFit='cover' maxW={{base: '100%', sm: '200px'}} src={props.data.image} /> <Stack mt='6' spacing='3'> <CardBody> <VStack spacing={'3'} alignItems={"flex-start"}> <Heading size='md'>{props.data.name}</Heading> <VStack spacing={'1'} alignItems={"flex-start"}> <Text> {props.data.description} </Text> {(props.mode === "checkout" ? <Text> {"Quantity: " + props.data.quantity} </Text> : <></>)} </VStack> {/* <----------------------- Add this block ----------------------> */} {(props.mode === "subscription" && props.data.stripeSubscriptionData ? <VStack spacing={'1'} alignItems={"flex-start"}> <Text> {"Next Payment Date: " + props.data.stripeSubscriptionData.nextPaymentDate} </Text> <Text> {"Subscribed On: " + props.data.stripeSubscriptionData.subscribedOn} </Text> {(props.data.stripeSubscriptionData.trialEndsOn ? <Text> {"Free Trial Running Until: " + props.data.stripeSubscriptionData.trialEndsOn} </Text> : <></>)} </VStack> : <></>)} </VStack> </CardBody> <CardFooter> <VStack alignItems={'flex-start'}> <Text color='blue.600' fontSize='2xl'> {"$" + props.data.price} </Text> {/* <----------------------- Add this block ----------------------> */} {(props.data.stripeSubscriptionData ? <Button colorScheme={'red'} onClick={cancelSubscription}>Cancel Subscription</Button> : <></>)} </VStack> </CardFooter> </Stack> </Card> } // Existing types here export default CartItem
// Existing imports here
function CartItem(props: CartItemProps) {
// Add this hook call and the cancelSubscription method to cancel the selected subscription
const toast = useToast()
const cancelSubscription = () => {
fetch(process.env.VITE_SERVER_BASE_URL + "/subscriptions/cancel", {
method: "POST",
headers: {'Content-Type': 'application/json'},
body: JSON.stringify({
subscriptionId: props.data.stripeSubscriptionData?.subscriptionId
})
})
.then(r => r.text())
.then(() => {
toast({
title: 'Subscription cancelled.',
description: "We've cancelled your subscription for you.",
status: 'success',
duration: 9000,
isClosable: true,
})
if (props.onCancelled)
props.onCancelled()
})
}
return <Card direction={{base: 'column', sm: 'row'}}
overflow='hidden'
width={'xl'}
variant='outline'>
<Image
objectFit='cover'
maxW={{base: '100%', sm: '200px'}}
src={props.data.image}
/>
<Stack mt='6' spacing='3'>
<CardBody>
<VStack spacing={'3'} alignItems={"flex-start"}>
<Heading size='md'>{props.data.name}</Heading>
<VStack spacing={'1'} alignItems={"flex-start"}>
<Text>
{props.data.description}
</Text>
{(props.mode === "checkout" ? <Text>
{"Quantity: " + props.data.quantity}
</Text> : <></>)}
</VStack>
{/* <----------------------- Add this block ----------------------> */}
{(props.mode === "subscription" && props.data.stripeSubscriptionData ?
<VStack spacing={'1'} alignItems={"flex-start"}>
<Text>
{"Next Payment Date: " + props.data.stripeSubscriptionData.nextPaymentDate}
</Text>
<Text>
{"Subscribed On: " + props.data.stripeSubscriptionData.subscribedOn}
</Text>
{(props.data.stripeSubscriptionData.trialEndsOn ? <Text>
{"Free Trial Running Until: " + props.data.stripeSubscriptionData.trialEndsOn}
</Text> : <></>)}
</VStack> : <></>)}
</VStack>
</CardBody>
<CardFooter>
<VStack alignItems={'flex-start'}>
<Text color='blue.600' fontSize='2xl'>
{"$" + props.data.price}
</Text>
{/* <----------------------- Add this block ----------------------> */}
{(props.data.stripeSubscriptionData ?
<Button colorScheme={'red'} onClick={cancelSubscription}>Cancel Subscription</Button>
: <></>)}
</VStack>
</CardFooter>
</Stack>
</Card>
}
// Existing types here
export default CartItem

接下來,在前臺 routes 目錄中建立 CancelSubscription.tsx 元件,並儲存以下程式碼:

Plain text
Copy to clipboard
Open code in new window
EnlighterJS 3 Syntax Highlighter
import {Button, Center, Heading, Input, VStack} from "@chakra-ui/react";
import {useState} from "react";
import CartItem, {ItemData, ServerSubscriptionsResponseType} from "../components/CartItem.tsx";
import {Subscriptions} from "../data.ts";
function CancelSubscription() {
const [email, setEmail] = useState("")
const [subscriptions, setSubscriptions] = useState<ItemData[]>([])
const onCustomerEmailChange = (ev: React.ChangeEvent<HTMLInputElement>) => {
setEmail(ev.target.value)
}
const listSubscriptions = () => {
fetch(process.env.VITE_SERVER_BASE_URL + "/subscriptions/list", {
method: "POST",
headers: {'Content-Type': 'application/json'},
body: JSON.stringify({
customerEmail: email,
})
})
.then(r => r.json())
.then((r: ServerSubscriptionsResponseType[]) => {
const subscriptionsList: ItemData[] = []
r.forEach(subscriptionItem => {
let subscriptionDetails = Subscriptions.find(elem => elem.id === subscriptionItem.appProductId) || undefined
if (subscriptionDetails) {
subscriptionDetails = {
...subscriptionDetails,
price: Number.parseInt(subscriptionItem.price) / 100,
stripeSubscriptionData: subscriptionItem,
}
subscriptionsList.push(subscriptionDetails)
} else {
console.log("Item not found!")
}
})
setSubscriptions(subscriptionsList)
})
}
const removeSubscription = (id: string | undefined) => {
const newSubscriptionsList = subscriptions.filter(elem => (elem.stripeSubscriptionData?.subscriptionId !== id))
setSubscriptions(newSubscriptionsList)
}
return <>
<Center h={'100vh'} color='black'>
<VStack spacing={3} width={'xl'}>
<Heading>Cancel Subscription Example</Heading>
{(subscriptions.length === 0 ? <>
<Input variant='filled' placeholder='Customer Email' onChange={onCustomerEmailChange}
value={email}/>
<Button onClick={listSubscriptions} colorScheme={'green'}>List Subscriptions</Button>
</> : <></>)}
{subscriptions.map(elem => {
return <CartItem data={elem} mode={'subscription'} onCancelled={() => removeSubscription(elem.stripeSubscriptionData?.subscriptionId)}/>
})}
</VStack>
</Center>
</>
}
export default CancelSubscription
import {Button, Center, Heading, Input, VStack} from "@chakra-ui/react"; import {useState} from "react"; import CartItem, {ItemData, ServerSubscriptionsResponseType} from "../components/CartItem.tsx"; import {Subscriptions} from "../data.ts"; function CancelSubscription() { const [email, setEmail] = useState("") const [subscriptions, setSubscriptions] = useState<ItemData[]>([]) const onCustomerEmailChange = (ev: React.ChangeEvent<HTMLInputElement>) => { setEmail(ev.target.value) } const listSubscriptions = () => { fetch(process.env.VITE_SERVER_BASE_URL + "/subscriptions/list", { method: "POST", headers: {'Content-Type': 'application/json'}, body: JSON.stringify({ customerEmail: email, }) }) .then(r => r.json()) .then((r: ServerSubscriptionsResponseType[]) => { const subscriptionsList: ItemData[] = [] r.forEach(subscriptionItem => { let subscriptionDetails = Subscriptions.find(elem => elem.id === subscriptionItem.appProductId) || undefined if (subscriptionDetails) { subscriptionDetails = { ...subscriptionDetails, price: Number.parseInt(subscriptionItem.price) / 100, stripeSubscriptionData: subscriptionItem, } subscriptionsList.push(subscriptionDetails) } else { console.log("Item not found!") } }) setSubscriptions(subscriptionsList) }) } const removeSubscription = (id: string | undefined) => { const newSubscriptionsList = subscriptions.filter(elem => (elem.stripeSubscriptionData?.subscriptionId !== id)) setSubscriptions(newSubscriptionsList) } return <> <Center h={'100vh'} color='black'> <VStack spacing={3} width={'xl'}> <Heading>Cancel Subscription Example</Heading> {(subscriptions.length === 0 ? <> <Input variant='filled' placeholder='Customer Email' onChange={onCustomerEmailChange} value={email}/> <Button onClick={listSubscriptions} colorScheme={'green'}>List Subscriptions</Button> </> : <></>)} {subscriptions.map(elem => { return <CartItem data={elem} mode={'subscription'} onCancelled={() => removeSubscription(elem.stripeSubscriptionData?.subscriptionId)}/> })} </VStack> </Center> </> } export default CancelSubscription
import {Button, Center, Heading, Input, VStack} from "@chakra-ui/react";
import {useState} from "react";
import CartItem, {ItemData, ServerSubscriptionsResponseType} from "../components/CartItem.tsx";
import {Subscriptions} from "../data.ts";
function CancelSubscription() {
const [email, setEmail] = useState("")
const [subscriptions, setSubscriptions] = useState<ItemData[]>([])
const onCustomerEmailChange = (ev: React.ChangeEvent<HTMLInputElement>) => {
setEmail(ev.target.value)
}
const listSubscriptions = () => {
fetch(process.env.VITE_SERVER_BASE_URL + "/subscriptions/list", {
method: "POST",
headers: {'Content-Type': 'application/json'},
body: JSON.stringify({
customerEmail: email,
})
})
.then(r => r.json())
.then((r: ServerSubscriptionsResponseType[]) => {
const subscriptionsList: ItemData[] = []
r.forEach(subscriptionItem => {
let subscriptionDetails = Subscriptions.find(elem => elem.id === subscriptionItem.appProductId) || undefined
if (subscriptionDetails) {
subscriptionDetails = {
...subscriptionDetails,
price: Number.parseInt(subscriptionItem.price) / 100,
stripeSubscriptionData: subscriptionItem,
}
subscriptionsList.push(subscriptionDetails)
} else {
console.log("Item not found!")
}
})
setSubscriptions(subscriptionsList)
})
}
const removeSubscription = (id: string | undefined) => {
const newSubscriptionsList = subscriptions.filter(elem => (elem.stripeSubscriptionData?.subscriptionId !== id))
setSubscriptions(newSubscriptionsList)
}
return <>
<Center h={'100vh'} color='black'>
<VStack spacing={3} width={'xl'}>
<Heading>Cancel Subscription Example</Heading>
{(subscriptions.length === 0 ? <>
<Input variant='filled' placeholder='Customer Email' onChange={onCustomerEmailChange}
value={email}/>
<Button onClick={listSubscriptions} colorScheme={'green'}>List Subscriptions</Button>
</> : <></>)}
{subscriptions.map(elem => {
return <CartItem data={elem} mode={'subscription'} onCancelled={() => removeSubscription(elem.stripeSubscriptionData?.subscriptionId)}/>
})}
</VStack>
</Center>
</>
}
export default CancelSubscription

該元件顯示一個輸入框和一個按鈕,供客戶輸入電子郵件並開始查詢訂閱。如果找到訂閱,輸入框和按鈕將被隱藏,螢幕上將顯示訂閱列表。對於每個訂閱專案,元件都會傳遞一個 removeSubscription 方法,請求 Java 後端伺服器取消 Stripe 後端的訂閱。

要將其附加到前端應用程式上的 /cancel-subscription 路由,請在 App 元件中傳遞給 createBrowserRouter 呼叫的陣列中新增以下程式碼:

Plain text
Copy to clipboard
Open code in new window
EnlighterJS 3 Syntax Highlighter
{
path: '/cancel-subscription',
element: (
<CancelSubscription/>
)
},
{ path: '/cancel-subscription', element: ( <CancelSubscription/> ) },
       {
path: '/cancel-subscription',
element: (
<CancelSubscription/>
)
},

要在後端伺服器上搜尋訂閱,請在後端專案的 PaymentController 類中新增一個 viewSubscriptions 方法,內容如下:

Plain text
Copy to clipboard
Open code in new window
EnlighterJS 3 Syntax Highlighter
@PostMapping("/subscriptions/list")
List<Map<String, String>> viewSubscriptions(@RequestBody RequestDTO requestDTO) throws StripeException {
Stripe.apiKey = STRIPE_API_KEY;
// Start by finding existing customer record from Stripe
Customer customer = CustomerUtil.findCustomerByEmail(requestDTO.getCustomerEmail());
// If no customer record was found, no subscriptions exist either, so return an empty list
if (customer == null) {
return new ArrayList<>();
}
// Search for subscriptions for the current customer
SubscriptionCollection subscriptions = Subscription.list(
SubscriptionListParams.builder()
.setCustomer(customer.getId())
.build());
List<Map<String, String>> response = new ArrayList<>();
// For each subscription record, query its item records and collect in a list of objects to send to the client
for (Subscription subscription : subscriptions.getData()) {
SubscriptionItemCollection currSubscriptionItems =
SubscriptionItem.list(SubscriptionItemListParams.builder()
.setSubscription(subscription.getId())
.addExpand("data.price.product")
.build());
for (SubscriptionItem item : currSubscriptionItems.getData()) {
HashMap<String, String> subscriptionData = new HashMap<>();
subscriptionData.put("appProductId", item.getPrice().getProductObject().getMetadata().get("app_id"));
subscriptionData.put("subscriptionId", subscription.getId());
subscriptionData.put("subscribedOn", new SimpleDateFormat("dd/MM/yyyy").format(new Date(subscription.getStartDate() * 1000)));
subscriptionData.put("nextPaymentDate", new SimpleDateFormat("dd/MM/yyyy").format(new Date(subscription.getCurrentPeriodEnd() * 1000)));
subscriptionData.put("price", item.getPrice().getUnitAmountDecimal().toString());
if (subscription.getTrialEnd() != null && new Date(subscription.getTrialEnd() * 1000).after(new Date()))
subscriptionData.put("trialEndsOn", new SimpleDateFormat("dd/MM/yyyy").format(new Date(subscription.getTrialEnd() * 1000)));
response.add(subscriptionData);
}
}
return response;
}
@PostMapping("/subscriptions/list") List<Map<String, String>> viewSubscriptions(@RequestBody RequestDTO requestDTO) throws StripeException { Stripe.apiKey = STRIPE_API_KEY; // Start by finding existing customer record from Stripe Customer customer = CustomerUtil.findCustomerByEmail(requestDTO.getCustomerEmail()); // If no customer record was found, no subscriptions exist either, so return an empty list if (customer == null) { return new ArrayList<>(); } // Search for subscriptions for the current customer SubscriptionCollection subscriptions = Subscription.list( SubscriptionListParams.builder() .setCustomer(customer.getId()) .build()); List<Map<String, String>> response = new ArrayList<>(); // For each subscription record, query its item records and collect in a list of objects to send to the client for (Subscription subscription : subscriptions.getData()) { SubscriptionItemCollection currSubscriptionItems = SubscriptionItem.list(SubscriptionItemListParams.builder() .setSubscription(subscription.getId()) .addExpand("data.price.product") .build()); for (SubscriptionItem item : currSubscriptionItems.getData()) { HashMap<String, String> subscriptionData = new HashMap<>(); subscriptionData.put("appProductId", item.getPrice().getProductObject().getMetadata().get("app_id")); subscriptionData.put("subscriptionId", subscription.getId()); subscriptionData.put("subscribedOn", new SimpleDateFormat("dd/MM/yyyy").format(new Date(subscription.getStartDate() * 1000))); subscriptionData.put("nextPaymentDate", new SimpleDateFormat("dd/MM/yyyy").format(new Date(subscription.getCurrentPeriodEnd() * 1000))); subscriptionData.put("price", item.getPrice().getUnitAmountDecimal().toString()); if (subscription.getTrialEnd() != null && new Date(subscription.getTrialEnd() * 1000).after(new Date())) subscriptionData.put("trialEndsOn", new SimpleDateFormat("dd/MM/yyyy").format(new Date(subscription.getTrialEnd() * 1000))); response.add(subscriptionData); } } return response; }
@PostMapping("/subscriptions/list")
List<Map<String, String>> viewSubscriptions(@RequestBody RequestDTO requestDTO) throws StripeException {
Stripe.apiKey = STRIPE_API_KEY;
// Start by finding existing customer record from Stripe
Customer customer = CustomerUtil.findCustomerByEmail(requestDTO.getCustomerEmail());
// If no customer record was found, no subscriptions exist either, so return an empty list
if (customer == null) {
return new ArrayList<>();
}
// Search for subscriptions for the current customer
SubscriptionCollection subscriptions = Subscription.list(
SubscriptionListParams.builder()
.setCustomer(customer.getId())
.build());
List<Map<String, String>> response = new ArrayList<>();
// For each subscription record, query its item records and collect in a list of objects to send to the client
for (Subscription subscription : subscriptions.getData()) {
SubscriptionItemCollection currSubscriptionItems =
SubscriptionItem.list(SubscriptionItemListParams.builder()
.setSubscription(subscription.getId())
.addExpand("data.price.product")
.build());
for (SubscriptionItem item : currSubscriptionItems.getData()) {
HashMap<String, String> subscriptionData = new HashMap<>();
subscriptionData.put("appProductId", item.getPrice().getProductObject().getMetadata().get("app_id"));
subscriptionData.put("subscriptionId", subscription.getId());
subscriptionData.put("subscribedOn", new SimpleDateFormat("dd/MM/yyyy").format(new Date(subscription.getStartDate() * 1000)));
subscriptionData.put("nextPaymentDate", new SimpleDateFormat("dd/MM/yyyy").format(new Date(subscription.getCurrentPeriodEnd() * 1000)));
subscriptionData.put("price", item.getPrice().getUnitAmountDecimal().toString());
if (subscription.getTrialEnd() != null && new Date(subscription.getTrialEnd() * 1000).after(new Date()))
subscriptionData.put("trialEndsOn", new SimpleDateFormat("dd/MM/yyyy").format(new Date(subscription.getTrialEnd() * 1000)));
response.add(subscriptionData);
}
}
return response;
}

上述方法首先在 Stripe 中找到給定使用者的客戶物件。然後,搜尋客戶的活動訂閱。收到訂閱列表後,提取其中的專案,並在應用程式產品資料庫中找到相應的產品傳送給前端。這一點很重要,因為前臺識別應用程式資料庫中每個產品的 ID 可能與儲存在 Stripe 中的產品 ID 相同,也可能不相同。

最後,在 PaymentController 類中建立 cancelSubscription 方法,並貼上下面的程式碼,以便根據傳遞的訂閱 ID 刪除訂閱。

Plain text
Copy to clipboard
Open code in new window
EnlighterJS 3 Syntax Highlighter
@PostMapping("/subscriptions/cancel")
String cancelSubscription(@RequestBody RequestDTO requestDTO) throws StripeException {
Stripe.apiKey = STRIPE_API_KEY;
Subscription subscription =
Subscription.retrieve(
requestDTO.getSubscriptionId()
);
Subscription deletedSubscription =
subscription.cancel();
return deletedSubscription.getStatus();
}
@PostMapping("/subscriptions/cancel") String cancelSubscription(@RequestBody RequestDTO requestDTO) throws StripeException { Stripe.apiKey = STRIPE_API_KEY; Subscription subscription = Subscription.retrieve( requestDTO.getSubscriptionId() ); Subscription deletedSubscription = subscription.cancel(); return deletedSubscription.getStatus(); }
@PostMapping("/subscriptions/cancel")
String cancelSubscription(@RequestBody RequestDTO requestDTO) throws StripeException {
Stripe.apiKey = STRIPE_API_KEY;
Subscription subscription =
Subscription.retrieve(
requestDTO.getSubscriptionId()
);
Subscription deletedSubscription =
subscription.cancel();
return deletedSubscription.getStatus();
}

該方法從 Stripe 獲取訂閱物件,呼叫取消方法,然後將訂閱狀態返回給客戶端。不過,要執行此方法,需要更新 DTO 物件以新增 subscriptionId 欄位。為此,請在 RequestDTO 類中新增以下欄位和方法:

Plain text
Copy to clipboard
Open code in new window
EnlighterJS 3 Syntax Highlighter
package com.kinsta.stripejava.backend;
import com.stripe.model.Product;
public class RequestDTO {
// … other fields …
// Add this
String subscriptionId;
// … other getters …
// Add this
public String getSubscriptionId() {
return subscriptionId;
}
}
package com.kinsta.stripejava.backend; import com.stripe.model.Product; public class RequestDTO { // … other fields … // Add this String subscriptionId; // … other getters … // Add this public String getSubscriptionId() { return subscriptionId; } }
package com.kinsta.stripejava.backend;
import com.stripe.model.Product;
public class RequestDTO {
// … other fields …
// Add this
String subscriptionId;
// … other getters …
// Add this
public String getSubscriptionId() {
return subscriptionId;
}
}

新增完成後,您就可以重新執行後臺和前臺應用程式的開發伺服器,檢視取消流程的執行情況:
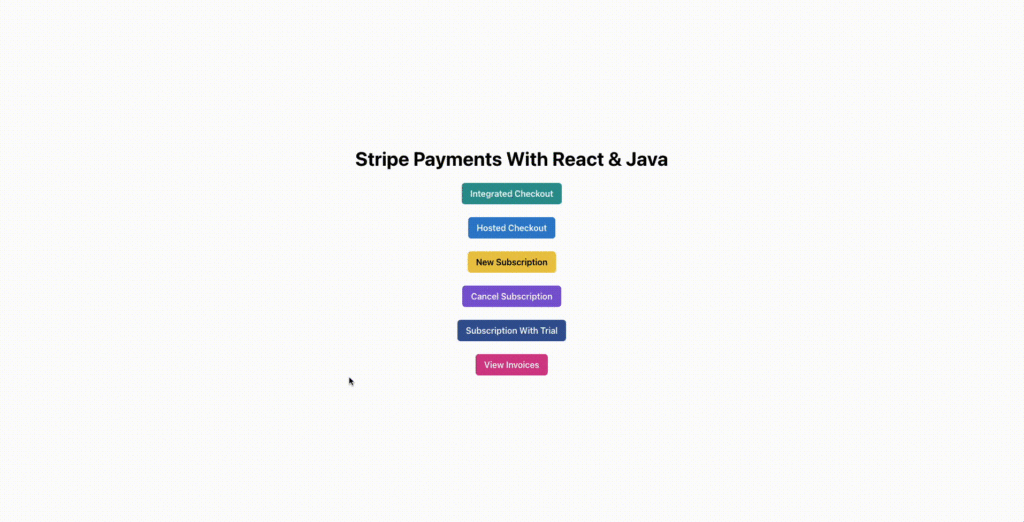
訂閱取消流程

訂閱取消流程

為零價值交易訂閱設定免費試用期

大多數現代訂閱的一個共同特點是,在向使用者收費之前提供一個短暫的免費試用期。這可以讓使用者在不投資的情況下了解產品或服務。不過,最好在客戶註冊免費試用期時儲存他們的付款詳細資訊,以便在試用期結束後立即向他們收費。

Stripe 大大簡化了此類訂閱的建立。首先,在 frontend/routes 目錄中生成一個名為 SubscriptionWithTrial.tsx 的新元件,然後貼上以下程式碼:

Plain text
Copy to clipboard
Open code in new window
EnlighterJS 3 Syntax Highlighter
import {Center, Heading, VStack} from "@chakra-ui/react";
import {useState} from "react";
import CartItem, {ItemData} from "../components/CartItem.tsx";
import TotalFooter from "../components/TotalFooter.tsx";
import CustomerDetails from "../components/CustomerDetails.tsx";
import {Subscriptions} from "../data.ts";
function SubscriptionWithTrial() {
const [items] = useState<ItemData[]>(Subscriptions)
return <>
<Center h={'100vh'} color='black'>
<VStack spacing='24px'>
<Heading>New Subscription With Trial Example</Heading>
{items.map(elem => {
return <CartItem data={elem} mode={'subscription'}/>
})}
<TotalFooter total={4.99} mode={"trial"}/>
<CustomerDetails data={items} endpoint={"/subscriptions/trial"}/>
</VStack>
</Center>
</>
}
export default SubscriptionWithTrial
import {Center, Heading, VStack} from "@chakra-ui/react"; import {useState} from "react"; import CartItem, {ItemData} from "../components/CartItem.tsx"; import TotalFooter from "../components/TotalFooter.tsx"; import CustomerDetails from "../components/CustomerDetails.tsx"; import {Subscriptions} from "../data.ts"; function SubscriptionWithTrial() { const [items] = useState<ItemData[]>(Subscriptions) return <> <Center h={'100vh'} color='black'> <VStack spacing='24px'> <Heading>New Subscription With Trial Example</Heading> {items.map(elem => { return <CartItem data={elem} mode={'subscription'}/> })} <TotalFooter total={4.99} mode={"trial"}/> <CustomerDetails data={items} endpoint={"/subscriptions/trial"}/> </VStack> </Center> </> } export default SubscriptionWithTrial
import {Center, Heading, VStack} from "@chakra-ui/react";
import {useState} from "react";
import CartItem, {ItemData} from "../components/CartItem.tsx";
import TotalFooter from "../components/TotalFooter.tsx";
import CustomerDetails from "../components/CustomerDetails.tsx";
import {Subscriptions} from "../data.ts";
function SubscriptionWithTrial() {
const [items] = useState<ItemData[]>(Subscriptions)
return <>
<Center h={'100vh'} color='black'>
<VStack spacing='24px'>
<Heading>New Subscription With Trial Example</Heading>
{items.map(elem => {
return <CartItem data={elem} mode={'subscription'}/>
})}
<TotalFooter total={4.99} mode={"trial"}/>
<CustomerDetails data={items} endpoint={"/subscriptions/trial"}/>
</VStack>
</Center>
</>
}
export default SubscriptionWithTrial

該元件重複使用了之前建立的元件。它與 NewSubscription 元件的主要區別在於,它將 TotalFooter 的模式設為 trial,而不是 subscription。這樣,TotalFooter 元件就會顯示一段文字,說明客戶現在可以開始免費試用,但一個月後將收取費用。

要將此元件附加到前端應用程式的 /subscription-with-trial 路由,請在 App 程式元件中傳給 createBrowserRouter 呼叫的陣列中新增以下程式碼:

Plain text
Copy to clipboard
Open code in new window
EnlighterJS 3 Syntax Highlighter
{
path: '/subscription-with-trial',
element: (
<SubscriptionWithTrial/>
)
},
{ path: '/subscription-with-trial', element: ( <SubscriptionWithTrial/> ) },
       {
path: '/subscription-with-trial',
element: (
<SubscriptionWithTrial/>
)
},

要在後臺建立 trial 訂閱的結賬流程,請在 PaymentController 類中建立一個名為 newSubscriptionWithTrial 的新方法,並新增以下程式碼:

Plain text
Copy to clipboard
Open code in new window
EnlighterJS 3 Syntax Highlighter
@PostMapping("/subscriptions/trial")
String newSubscriptionWithTrial(@RequestBody RequestDTO requestDTO) throws StripeException {
Stripe.apiKey = STRIPE_API_KEY;
String clientBaseURL = System.getenv().get("CLIENT_BASE_URL");
// Start by finding existing customer record from Stripe or creating a new one if needed
Customer customer = CustomerUtil.findOrCreateCustomer(requestDTO.getCustomerEmail(), requestDTO.getCustomerName());
// Next, create a checkout session by adding the details of the checkout
SessionCreateParams.Builder paramsBuilder =
SessionCreateParams.builder()
.setMode(SessionCreateParams.Mode.SUBSCRIPTION)
.setCustomer(customer.getId())
.setSuccessUrl(clientBaseURL + "/success?session_id={CHECKOUT_SESSION_ID}")
.setCancelUrl(clientBaseURL + "/failure")
// For trials, you need to set the trial period in the session creation request
.setSubscriptionData(SessionCreateParams.SubscriptionData.builder().setTrialPeriodDays(30L).build());
for (Product product : requestDTO.getItems()) {
paramsBuilder.addLineItem(
SessionCreateParams.LineItem.builder()
.setQuantity(1L)
.setPriceData(
PriceData.builder()
.setProductData(
PriceData.ProductData.builder()
.putMetadata("app_id", product.getId())
.setName(product.getName())
.build()
)
.setCurrency(ProductDAO.getProduct(product.getId()).getDefaultPriceObject().getCurrency())
.setUnitAmountDecimal(ProductDAO.getProduct(product.getId()).getDefaultPriceObject().getUnitAmountDecimal())
.setRecurring(PriceData.Recurring.builder().setInterval(PriceData.Recurring.Interval.MONTH).build())
.build())
.build());
}
Session session = Session.create(paramsBuilder.build());
return session.getUrl();
}
@PostMapping("/subscriptions/trial") String newSubscriptionWithTrial(@RequestBody RequestDTO requestDTO) throws StripeException { Stripe.apiKey = STRIPE_API_KEY; String clientBaseURL = System.getenv().get("CLIENT_BASE_URL"); // Start by finding existing customer record from Stripe or creating a new one if needed Customer customer = CustomerUtil.findOrCreateCustomer(requestDTO.getCustomerEmail(), requestDTO.getCustomerName()); // Next, create a checkout session by adding the details of the checkout SessionCreateParams.Builder paramsBuilder = SessionCreateParams.builder() .setMode(SessionCreateParams.Mode.SUBSCRIPTION) .setCustomer(customer.getId()) .setSuccessUrl(clientBaseURL + "/success?session_id={CHECKOUT_SESSION_ID}") .setCancelUrl(clientBaseURL + "/failure") // For trials, you need to set the trial period in the session creation request .setSubscriptionData(SessionCreateParams.SubscriptionData.builder().setTrialPeriodDays(30L).build()); for (Product product : requestDTO.getItems()) { paramsBuilder.addLineItem( SessionCreateParams.LineItem.builder() .setQuantity(1L) .setPriceData( PriceData.builder() .setProductData( PriceData.ProductData.builder() .putMetadata("app_id", product.getId()) .setName(product.getName()) .build() ) .setCurrency(ProductDAO.getProduct(product.getId()).getDefaultPriceObject().getCurrency()) .setUnitAmountDecimal(ProductDAO.getProduct(product.getId()).getDefaultPriceObject().getUnitAmountDecimal()) .setRecurring(PriceData.Recurring.builder().setInterval(PriceData.Recurring.Interval.MONTH).build()) .build()) .build()); } Session session = Session.create(paramsBuilder.build()); return session.getUrl(); }
    @PostMapping("/subscriptions/trial")
String newSubscriptionWithTrial(@RequestBody RequestDTO requestDTO) throws StripeException {
Stripe.apiKey = STRIPE_API_KEY;
String clientBaseURL = System.getenv().get("CLIENT_BASE_URL");
// Start by finding existing customer record from Stripe or creating a new one if needed
Customer customer = CustomerUtil.findOrCreateCustomer(requestDTO.getCustomerEmail(), requestDTO.getCustomerName());
// Next, create a checkout session by adding the details of the checkout
SessionCreateParams.Builder paramsBuilder =
SessionCreateParams.builder()
.setMode(SessionCreateParams.Mode.SUBSCRIPTION)
.setCustomer(customer.getId())
.setSuccessUrl(clientBaseURL + "/success?session_id={CHECKOUT_SESSION_ID}")
.setCancelUrl(clientBaseURL + "/failure")
// For trials, you need to set the trial period in the session creation request
.setSubscriptionData(SessionCreateParams.SubscriptionData.builder().setTrialPeriodDays(30L).build());
for (Product product : requestDTO.getItems()) {
paramsBuilder.addLineItem(
SessionCreateParams.LineItem.builder()
.setQuantity(1L)
.setPriceData(
PriceData.builder()
.setProductData(
PriceData.ProductData.builder()
.putMetadata("app_id", product.getId())
.setName(product.getName())
.build()
)
.setCurrency(ProductDAO.getProduct(product.getId()).getDefaultPriceObject().getCurrency())
.setUnitAmountDecimal(ProductDAO.getProduct(product.getId()).getDefaultPriceObject().getUnitAmountDecimal())
.setRecurring(PriceData.Recurring.builder().setInterval(PriceData.Recurring.Interval.MONTH).build())
.build())
.build());
}
Session session = Session.create(paramsBuilder.build());
return session.getUrl();
}

這段程式碼與 newSubscription 方法非常相似。唯一(也是最重要的)不同之處在於,會話建立引數物件中傳遞的試用期值為 30,表示免費試用期為 30 天。

現在,您可以儲存更改並重新執行後端和前端的開發伺服器,檢視帶有免費試用期的訂閱工作流的執行情況:
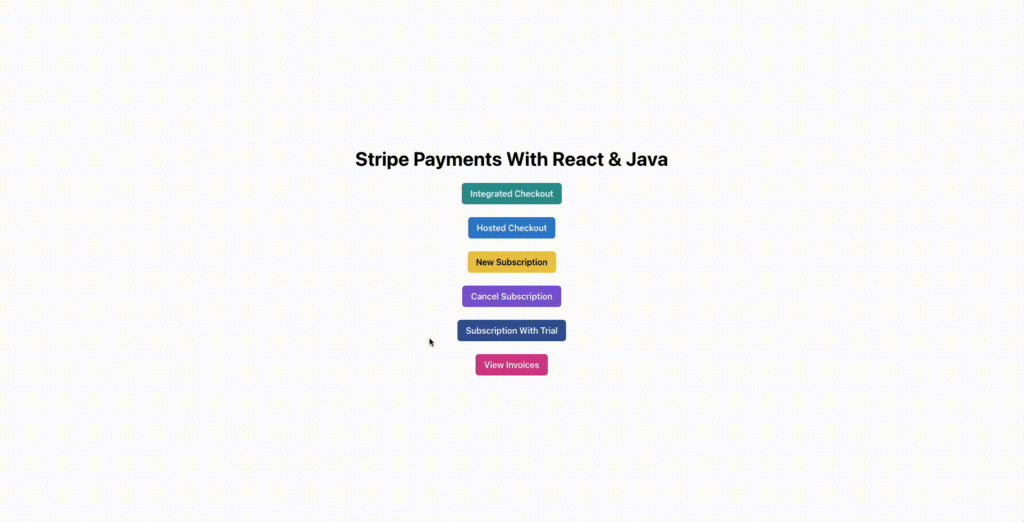
訂閱免費試用流程

訂閱免費試用流程

為付款生成發票

對於訂閱,Stripe 會自動為每次付款生成發票,即使是試用註冊的零金額交易也不例外。對於一次性付款,您可以根據需要選擇建立發票。

要開始將所有付款與發票關聯起來,請更新前端應用程式中 CustomerDetails 元件的 initiatePayment 函式中傳送的支付負載的正文,使其包含以下屬性:

Plain text
Copy to clipboard
Open code in new window
EnlighterJS 3 Syntax Highlighter
invoiceNeeded: true
invoiceNeeded: true
invoiceNeeded: true

您還需要在 IntegratedCheckout 元件的 createTransactionSecret 函式中傳送到伺服器的有效載荷正文中新增此屬性。

接下來,更新後端路由以檢查此新屬性,並相應地更新 Stripe SDK 呼叫。

對於託管結賬方法,要新增發票功能,請更新 hostedCheckout 方法,新增以下程式碼行:

Plain text
Copy to clipboard
Open code in new window
EnlighterJS 3 Syntax Highlighter
@PostMapping("/checkout/hosted")
String hostedCheckout(@RequestBody RequestDTO requestDTO) throws StripeException {
// … other operations being done after creating the SessionCreateParams builder instance
// Add the following block of code just before the SessionCreateParams are built from the builder instance
if (requestDTO.isInvoiceNeeded()) {
paramsBuilder.setInvoiceCreation(SessionCreateParams.InvoiceCreation.builder().setEnabled(true).build());
}
Session session = Session.create(paramsBuilder.build());
return session.getUrl();
}
@PostMapping("/checkout/hosted") String hostedCheckout(@RequestBody RequestDTO requestDTO) throws StripeException { // … other operations being done after creating the SessionCreateParams builder instance // Add the following block of code just before the SessionCreateParams are built from the builder instance if (requestDTO.isInvoiceNeeded()) { paramsBuilder.setInvoiceCreation(SessionCreateParams.InvoiceCreation.builder().setEnabled(true).build()); } Session session = Session.create(paramsBuilder.build()); return session.getUrl(); }
@PostMapping("/checkout/hosted")
String hostedCheckout(@RequestBody RequestDTO requestDTO) throws StripeException {
// … other operations being done after creating the SessionCreateParams builder instance       
// Add the following block of code just before the SessionCreateParams are built from the builder instance
if (requestDTO.isInvoiceNeeded()) {
paramsBuilder.setInvoiceCreation(SessionCreateParams.InvoiceCreation.builder().setEnabled(true).build());
}
Session session = Session.create(paramsBuilder.build());
return session.getUrl();
}

這將檢查 invoiceNeeded 欄位,並相應設定建立引數。

為整合付款新增發票略顯麻煩。你不能簡單地設定一個引數,指示 Stripe 自動為付款建立發票。您必須手動建立發票,然後建立一個連結的付款意向。

如果支付意向成功支付並完成,發票就會被標記為已支付;否則,發票仍未支付。雖然這在邏輯上說得通,但實施起來可能有點複雜(尤其是在沒有明確示例或參考資料可循的情況下)。

要實現這一點,請更新 integratedCheckout 方法,使其看起來像這樣:

Plain text
Copy to clipboard
Open code in new window
EnlighterJS 3 Syntax Highlighter
String integratedCheckout(@RequestBody RequestDTO requestDTO) throws StripeException {
Stripe.apiKey = STRIPE_API_KEY;
// Start by finding an existing customer or creating a new one if needed
Customer customer = CustomerUtil.findOrCreateCustomer(requestDTO.getCustomerEmail(), requestDTO.getCustomerName());
PaymentIntent paymentIntent;
if (!requestDTO.isInvoiceNeeded()) {
// If the invoice is not needed, create a PaymentIntent directly and send it to the client
PaymentIntentCreateParams params =
PaymentIntentCreateParams.builder()
.setAmount(Long.parseLong(calculateOrderAmount(requestDTO.getItems())))
.setCurrency("usd")
.setCustomer(customer.getId())
.setAutomaticPaymentMethods(
PaymentIntentCreateParams.AutomaticPaymentMethods
.builder()
.setEnabled(true)
.build()
)
.build();
paymentIntent = PaymentIntent.create(params);
} else {
// If invoice is needed, create the invoice object, add line items to it, and finalize it to create the PaymentIntent automatically
InvoiceCreateParams invoiceCreateParams = new InvoiceCreateParams.Builder()
.setCustomer(customer.getId())
.build();
Invoice invoice = Invoice.create(invoiceCreateParams);
// Add each item to the invoice one by one
for (Product product : requestDTO.getItems()) {
// Look for existing Product in Stripe before creating a new one
Product stripeProduct;
ProductSearchResult results = Product.search(ProductSearchParams.builder()
.setQuery("metadata['app_id']:'" + product.getId() + "'")
.build());
if (results.getData().size() != 0)
stripeProduct = results.getData().get(0);
else {
// If a product is not found in Stripe database, create it
ProductCreateParams productCreateParams = new ProductCreateParams.Builder()
.setName(product.getName())
.putMetadata("app_id", product.getId())
.build();
stripeProduct = Product.create(productCreateParams);
}
// Create an invoice line item using the product object for the line item
InvoiceItemCreateParams invoiceItemCreateParams = new InvoiceItemCreateParams.Builder()
.setInvoice(invoice.getId())
.setQuantity(1L)
.setCustomer(customer.getId())
.setPriceData(
InvoiceItemCreateParams.PriceData.builder()
.setProduct(stripeProduct.getId())
.setCurrency(ProductDAO.getProduct(product.getId()).getDefaultPriceObject().getCurrency())
.setUnitAmountDecimal(ProductDAO.getProduct(product.getId()).getDefaultPriceObject().getUnitAmountDecimal())
.build())
.build();
InvoiceItem.create(invoiceItemCreateParams);
}
// Mark the invoice as final so that a PaymentIntent is created for it
invoice = invoice.finalizeInvoice();
// Retrieve the payment intent object from the invoice
paymentIntent = PaymentIntent.retrieve(invoice.getPaymentIntent());
}
// Send the client secret from the payment intent to the client
return paymentIntent.getClientSecret();
}
String integratedCheckout(@RequestBody RequestDTO requestDTO) throws StripeException { Stripe.apiKey = STRIPE_API_KEY; // Start by finding an existing customer or creating a new one if needed Customer customer = CustomerUtil.findOrCreateCustomer(requestDTO.getCustomerEmail(), requestDTO.getCustomerName()); PaymentIntent paymentIntent; if (!requestDTO.isInvoiceNeeded()) { // If the invoice is not needed, create a PaymentIntent directly and send it to the client PaymentIntentCreateParams params = PaymentIntentCreateParams.builder() .setAmount(Long.parseLong(calculateOrderAmount(requestDTO.getItems()))) .setCurrency("usd") .setCustomer(customer.getId()) .setAutomaticPaymentMethods( PaymentIntentCreateParams.AutomaticPaymentMethods .builder() .setEnabled(true) .build() ) .build(); paymentIntent = PaymentIntent.create(params); } else { // If invoice is needed, create the invoice object, add line items to it, and finalize it to create the PaymentIntent automatically InvoiceCreateParams invoiceCreateParams = new InvoiceCreateParams.Builder() .setCustomer(customer.getId()) .build(); Invoice invoice = Invoice.create(invoiceCreateParams); // Add each item to the invoice one by one for (Product product : requestDTO.getItems()) { // Look for existing Product in Stripe before creating a new one Product stripeProduct; ProductSearchResult results = Product.search(ProductSearchParams.builder() .setQuery("metadata['app_id']:'" + product.getId() + "'") .build()); if (results.getData().size() != 0) stripeProduct = results.getData().get(0); else { // If a product is not found in Stripe database, create it ProductCreateParams productCreateParams = new ProductCreateParams.Builder() .setName(product.getName()) .putMetadata("app_id", product.getId()) .build(); stripeProduct = Product.create(productCreateParams); } // Create an invoice line item using the product object for the line item InvoiceItemCreateParams invoiceItemCreateParams = new InvoiceItemCreateParams.Builder() .setInvoice(invoice.getId()) .setQuantity(1L) .setCustomer(customer.getId()) .setPriceData( InvoiceItemCreateParams.PriceData.builder() .setProduct(stripeProduct.getId()) .setCurrency(ProductDAO.getProduct(product.getId()).getDefaultPriceObject().getCurrency()) .setUnitAmountDecimal(ProductDAO.getProduct(product.getId()).getDefaultPriceObject().getUnitAmountDecimal()) .build()) .build(); InvoiceItem.create(invoiceItemCreateParams); } // Mark the invoice as final so that a PaymentIntent is created for it invoice = invoice.finalizeInvoice(); // Retrieve the payment intent object from the invoice paymentIntent = PaymentIntent.retrieve(invoice.getPaymentIntent()); } // Send the client secret from the payment intent to the client return paymentIntent.getClientSecret(); }
String integratedCheckout(@RequestBody RequestDTO requestDTO) throws StripeException {
Stripe.apiKey = STRIPE_API_KEY;
// Start by finding an existing customer or creating a new one if needed
Customer customer = CustomerUtil.findOrCreateCustomer(requestDTO.getCustomerEmail(), requestDTO.getCustomerName());
PaymentIntent paymentIntent;
if (!requestDTO.isInvoiceNeeded()) {
// If the invoice is not needed, create a PaymentIntent directly and send it to the client
PaymentIntentCreateParams params =
PaymentIntentCreateParams.builder()
.setAmount(Long.parseLong(calculateOrderAmount(requestDTO.getItems())))
.setCurrency("usd")
.setCustomer(customer.getId())
.setAutomaticPaymentMethods(
PaymentIntentCreateParams.AutomaticPaymentMethods
.builder()
.setEnabled(true)
.build()
)
.build();
paymentIntent = PaymentIntent.create(params);
} else {
// If invoice is needed, create the invoice object, add line items to it, and finalize it to create the PaymentIntent automatically
InvoiceCreateParams invoiceCreateParams = new InvoiceCreateParams.Builder()
.setCustomer(customer.getId())
.build();
Invoice invoice = Invoice.create(invoiceCreateParams);
// Add each item to the invoice one by one
for (Product product : requestDTO.getItems()) {
// Look for existing Product in Stripe before creating a new one
Product stripeProduct;
ProductSearchResult results = Product.search(ProductSearchParams.builder()
.setQuery("metadata['app_id']:'" + product.getId() + "'")
.build());
if (results.getData().size() != 0)
stripeProduct = results.getData().get(0);
else {
// If a product is not found in Stripe database, create it
ProductCreateParams productCreateParams = new ProductCreateParams.Builder()
.setName(product.getName())
.putMetadata("app_id", product.getId())
.build();
stripeProduct = Product.create(productCreateParams);
}
// Create an invoice line item using the product object for the line item
InvoiceItemCreateParams invoiceItemCreateParams = new InvoiceItemCreateParams.Builder()
.setInvoice(invoice.getId())
.setQuantity(1L)
.setCustomer(customer.getId())
.setPriceData(
InvoiceItemCreateParams.PriceData.builder()
.setProduct(stripeProduct.getId())
.setCurrency(ProductDAO.getProduct(product.getId()).getDefaultPriceObject().getCurrency())
.setUnitAmountDecimal(ProductDAO.getProduct(product.getId()).getDefaultPriceObject().getUnitAmountDecimal())
.build())
.build();
InvoiceItem.create(invoiceItemCreateParams);
}
// Mark the invoice as final so that a PaymentIntent is created for it
invoice = invoice.finalizeInvoice();
// Retrieve the payment intent object from the invoice
paymentIntent = PaymentIntent.retrieve(invoice.getPaymentIntent());
}
// Send the client secret from the payment intent to the client
return paymentIntent.getClientSecret();
}

該方法的舊程式碼被移到 if 程式碼塊中,用於檢查 invoiceNeeded 欄位是否為 false。如果為 true,該方法就會建立一張包含發票專案的發票,並將其標記為最終完成,以便付款。

然後,它會檢索發票最終確定時自動建立的付款意向,並將該付款意向中的客戶祕密傳送給客戶。一旦客戶完成整合結賬流程,付款就會被收取,發票也會被標記為已付款。

這樣就完成了開始從應用程式生成發票所需的設定。您可以前往 Stripe 儀表板上的發票部分,檢視應用程式在每次購買和訂閱付款時生成的發票。

不過,Stripe 還允許您通過 API 訪問發票,為客戶提供自助服務體驗,讓他們隨時下載發票。

為此,請在 frontend/routes 目錄中建立一個名為 ViewInvoices.tsx 的新元件。在其中貼上以下程式碼:

Plain text
Copy to clipboard
Open code in new window
EnlighterJS 3 Syntax Highlighter
import {Button, Card, Center, Heading, HStack, IconButton, Input, Text, VStack} from "@chakra-ui/react";
import {useState} from "react";
import {DownloadIcon} from "@chakra-ui/icons";
function ViewInvoices() {
const [email, setEmail] = useState("")
const [invoices, setInvoices] = useState<InvoiceData[]>([])
const onCustomerEmailChange = (ev: React.ChangeEvent<HTMLInputElement>) => {
setEmail(ev.target.value)
}
const listInvoices = () => {
fetch(process.env.VITE_SERVER_BASE_URL + "/invoices/list", {
method: "POST",
headers: {'Content-Type': 'application/json'},
body: JSON.stringify({
customerEmail: email,
})
})
.then(r => r.json())
.then((r: InvoiceData[]) => {
setInvoices(r)
})
}
return <>
<Center h={'100vh'} color='black'>
<VStack spacing={3} width={'xl'}>
<Heading>View Invoices for Customer</Heading>
{(invoices.length === 0 ? <>
<Input variant='filled' placeholder='Customer Email' onChange={onCustomerEmailChange}
value={email}/>
<Button onClick={listInvoices} colorScheme={'green'}>Look up Invoices</Button>
</> : <></>)}
{invoices.map(elem => {
return <Card direction={{base: 'column', sm: 'row'}}
overflow='hidden'
alignItems={'center'}
justifyContent={'space-between'}
padding={'8px'}
width={500}
variant='outline'>
<Text>
{elem.number}
</Text>
<HStack spacing={"3"}>
<Text color='blue.600' fontSize='2xl'>
{"$" + elem.amount}
</Text>
<IconButton onClick={() => {
window.location.href = elem.url
}} icon={<DownloadIcon/>} aria-label={'Download invoice'}/>
</HStack>
</Card>
})}
</VStack>
</Center>
</>
}
interface InvoiceData {
number: string,
amount: string,
url: string
}
export default ViewInvoices
import {Button, Card, Center, Heading, HStack, IconButton, Input, Text, VStack} from "@chakra-ui/react"; import {useState} from "react"; import {DownloadIcon} from "@chakra-ui/icons"; function ViewInvoices() { const [email, setEmail] = useState("") const [invoices, setInvoices] = useState<InvoiceData[]>([]) const onCustomerEmailChange = (ev: React.ChangeEvent<HTMLInputElement>) => { setEmail(ev.target.value) } const listInvoices = () => { fetch(process.env.VITE_SERVER_BASE_URL + "/invoices/list", { method: "POST", headers: {'Content-Type': 'application/json'}, body: JSON.stringify({ customerEmail: email, }) }) .then(r => r.json()) .then((r: InvoiceData[]) => { setInvoices(r) }) } return <> <Center h={'100vh'} color='black'> <VStack spacing={3} width={'xl'}> <Heading>View Invoices for Customer</Heading> {(invoices.length === 0 ? <> <Input variant='filled' placeholder='Customer Email' onChange={onCustomerEmailChange} value={email}/> <Button onClick={listInvoices} colorScheme={'green'}>Look up Invoices</Button> </> : <></>)} {invoices.map(elem => { return <Card direction={{base: 'column', sm: 'row'}} overflow='hidden' alignItems={'center'} justifyContent={'space-between'} padding={'8px'} width={500} variant='outline'> <Text> {elem.number} </Text> <HStack spacing={"3"}> <Text color='blue.600' fontSize='2xl'> {"$" + elem.amount} </Text> <IconButton onClick={() => { window.location.href = elem.url }} icon={<DownloadIcon/>} aria-label={'Download invoice'}/> </HStack> </Card> })} </VStack> </Center> </> } interface InvoiceData { number: string, amount: string, url: string } export default ViewInvoices
import {Button, Card, Center, Heading, HStack, IconButton, Input, Text, VStack} from "@chakra-ui/react";
import {useState} from "react";
import {DownloadIcon} from "@chakra-ui/icons";
function ViewInvoices() {
const [email, setEmail] = useState("")
const [invoices, setInvoices] = useState<InvoiceData[]>([])
const onCustomerEmailChange = (ev: React.ChangeEvent<HTMLInputElement>) => {
setEmail(ev.target.value)
}
const listInvoices = () => {
fetch(process.env.VITE_SERVER_BASE_URL + "/invoices/list", {
method: "POST",
headers: {'Content-Type': 'application/json'},
body: JSON.stringify({
customerEmail: email,
})
})
.then(r => r.json())
.then((r: InvoiceData[]) => {
setInvoices(r)
})
}
return <>
<Center h={'100vh'} color='black'>
<VStack spacing={3} width={'xl'}>
<Heading>View Invoices for Customer</Heading>
{(invoices.length === 0 ? <>
<Input variant='filled' placeholder='Customer Email' onChange={onCustomerEmailChange}
value={email}/>
<Button onClick={listInvoices} colorScheme={'green'}>Look up Invoices</Button>
</> : <></>)}
{invoices.map(elem => {
return <Card direction={{base: 'column', sm: 'row'}}
overflow='hidden'
alignItems={'center'}
justifyContent={'space-between'}
padding={'8px'}
width={500}
variant='outline'>
<Text>
{elem.number}
</Text>
<HStack spacing={"3"}>
<Text color='blue.600' fontSize='2xl'>
{"$" + elem.amount}
</Text>
<IconButton onClick={() => {
window.location.href = elem.url
}} icon={<DownloadIcon/>} aria-label={'Download invoice'}/>
</HStack>
</Card>
})}
</VStack>
</Center>
</>
}
interface InvoiceData {
number: string,
amount: string,
url: string
}
export default ViewInvoices

CancelSubscription 元件類似,該元件顯示一個供客戶輸入電子郵件的輸入框和一個搜尋發票的按鈕。一旦找到發票,輸入欄位和按鈕就會隱藏,並向客戶顯示包含發票編號、總金額和下載發票 PDF 按鈕的發票列表。

要實現搜尋給定客戶的發票併傳送相關資訊(發票編號、金額和 PDF URL)的後臺方法,請在後臺的 PaymentController 類中新增以下方法;

Plain text
Copy to clipboard
Open code in new window
EnlighterJS 3 Syntax Highlighter
@PostMapping("/invoices/list")
List<Map<String, String>> listInvoices(@RequestBody RequestDTO requestDTO) throws StripeException {
Stripe.apiKey = STRIPE_API_KEY;
// Start by finding existing customer record from Stripe
Customer customer = CustomerUtil.findCustomerByEmail(requestDTO.getCustomerEmail());
// If no customer record was found, no subscriptions exist either, so return an empty list
if (customer == null) {
return new ArrayList<>();
}
// Search for invoices for the current customer
Map<String, Object> invoiceSearchParams = new HashMap<>();
invoiceSearchParams.put("customer", customer.getId());
InvoiceCollection invoices =
Invoice.list(invoiceSearchParams);
List<Map<String, String>> response = new ArrayList<>();
// For each invoice, extract its number, amount, and PDF URL to send to the client
for (Invoice invoice : invoices.getData()) {
HashMap<String, String> map = new HashMap<>();
map.put("number", invoice.getNumber());
map.put("amount", String.valueOf((invoice.getTotal() / 100f)));
map.put("url", invoice.getInvoicePdf());
response.add(map);
}
return response;
}
@PostMapping("/invoices/list") List<Map<String, String>> listInvoices(@RequestBody RequestDTO requestDTO) throws StripeException { Stripe.apiKey = STRIPE_API_KEY; // Start by finding existing customer record from Stripe Customer customer = CustomerUtil.findCustomerByEmail(requestDTO.getCustomerEmail()); // If no customer record was found, no subscriptions exist either, so return an empty list if (customer == null) { return new ArrayList<>(); } // Search for invoices for the current customer Map<String, Object> invoiceSearchParams = new HashMap<>(); invoiceSearchParams.put("customer", customer.getId()); InvoiceCollection invoices = Invoice.list(invoiceSearchParams); List<Map<String, String>> response = new ArrayList<>(); // For each invoice, extract its number, amount, and PDF URL to send to the client for (Invoice invoice : invoices.getData()) { HashMap<String, String> map = new HashMap<>(); map.put("number", invoice.getNumber()); map.put("amount", String.valueOf((invoice.getTotal() / 100f))); map.put("url", invoice.getInvoicePdf()); response.add(map); } return response; }
@PostMapping("/invoices/list")
List<Map<String, String>> listInvoices(@RequestBody RequestDTO requestDTO) throws StripeException {
Stripe.apiKey = STRIPE_API_KEY;
// Start by finding existing customer record from Stripe
Customer customer = CustomerUtil.findCustomerByEmail(requestDTO.getCustomerEmail());
// If no customer record was found, no subscriptions exist either, so return an empty list
if (customer == null) {
return new ArrayList<>();
}
// Search for invoices for the current customer
Map<String, Object> invoiceSearchParams = new HashMap<>();
invoiceSearchParams.put("customer", customer.getId());
InvoiceCollection invoices =
Invoice.list(invoiceSearchParams);
List<Map<String, String>> response = new ArrayList<>();
// For each invoice, extract its number, amount, and PDF URL to send to the client
for (Invoice invoice : invoices.getData()) {
HashMap<String, String> map = new HashMap<>();
map.put("number", invoice.getNumber());
map.put("amount", String.valueOf((invoice.getTotal() / 100f)));
map.put("url", invoice.getInvoicePdf());
response.add(map);
}
return response;
}

該方法首先根據提供的電子郵件地址查詢客戶。然後,查詢該客戶已標記為已付款的發票。一旦找到發票列表,它就會提取發票號碼、金額和 PDF URL,並將這些資訊的列表傳送回客戶應用程式。

這就是發票流程的樣子:
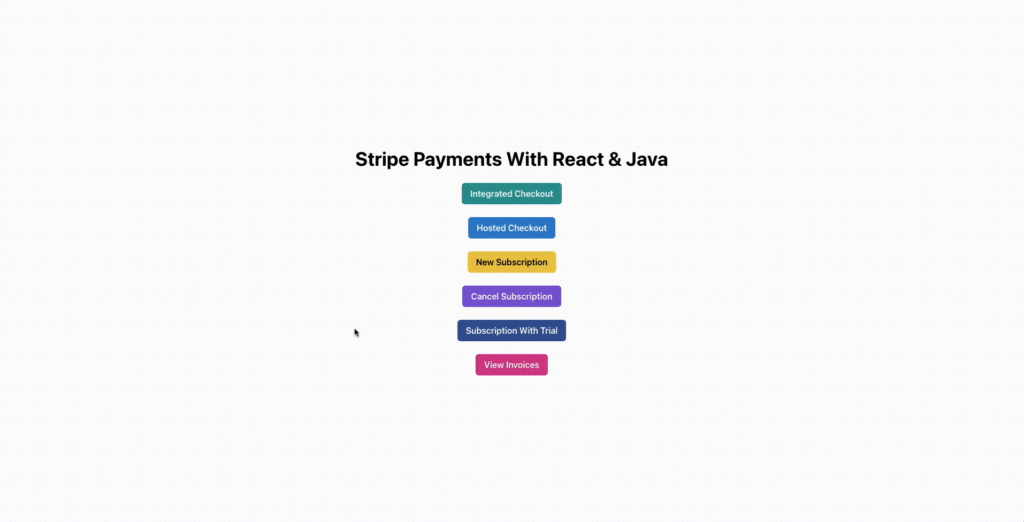
檢視發票

檢視發票

至此,我們的 Java 應用程式(前端後臺)演示開發完成。在下一節中,您將學習如何將此應用程式部署到 Kinsta,以便線上訪問。

將應用程式部署到 Kinsta

應用程式準備就緒後,您就可以將其部署到 Kinsta。Kinsta 支援從您偏好的 Git 提供商(Bitbucket、GitHub 或 GitLab)進行部署。將應用程式的原始碼庫連線到 Kinsta,每當程式碼有變動時,它就會自動部署應用程式。

準備專案

要將應用程式部署到生產環境,請確定 Kinsta 將使用的構建和部署命令。對於前端,請確保 package.json 檔案中定義了以下指令碼:

Plain text
Copy to clipboard
Open code in new window
EnlighterJS 3 Syntax Highlighter
"scripts": {
"dev": "vite",
"build": "NODE_ENV=production tsc && vite build",
"start": "serve ./dist",
"lint": "eslint . --ext ts,tsx --report-unused-disable-directives --max-warnings 0",
"preview": "vite preview"
},
"scripts": { "dev": "vite", "build": "NODE_ENV=production tsc && vite build", "start": "serve ./dist", "lint": "eslint . --ext ts,tsx --report-unused-disable-directives --max-warnings 0", "preview": "vite preview" },
"scripts": {
"dev": "vite",
"build": "NODE_ENV=production tsc && vite build",
"start": "serve ./dist",
"lint": "eslint . --ext ts,tsx --report-unused-disable-directives --max-warnings 0",
"preview": "vite preview"
},

您還需要安裝 serve npm 軟體包,以便為靜態網站提供服務。該軟體包將用於在 Kinsta 部署環境中為應用程式的生產構建提供服務。執行以下命令即可安裝:

Plain text
Copy to clipboard
Open code in new window
EnlighterJS 3 Syntax Highlighter
npm i serve
npm i serve
npm i serve

使用 vite 構建應用程式後,整個應用程式將打包成一個檔案 index.html,因為本教學中使用的 React 配置旨在建立單頁面應用程式。雖然這不會對使用者造成很大影響,但您需要設定一些額外的配置來處理此類應用程式中的瀏覽器路由和導航。

在當前配置下,您只能通過部署的基本 URL 訪問應用程式。如果部署的基本 URL 是 example.com,那麼對 example.com/some-route 的任何請求都會導致 HTTP 404 錯誤。

這是因為伺服器只有一個檔案,即 index.html 檔案。傳送到 example.com/some-route 的請求會開始查詢檔案 some-route/index.html,但該檔案並不存在,因此會收到 404 Not Found 響應。

要解決這個問題,請在 frontend/public 資料夾中建立一個名為 serve.json 的檔案,並在其中儲存以下程式碼:

Plain text
Copy to clipboard
Open code in new window
EnlighterJS 3 Syntax Highlighter
{
"rewrites": [
{ "source": "*", "destination": "/index.html" }
]
}
{ "rewrites": [ { "source": "*", "destination": "/index.html" } ] }
{
"rewrites": [
{ "source": "*", "destination": "/index.html" }
]
}

該檔案將指示 serve 重寫所有傳入請求,使其指向 index.html 檔案,同時仍在響應中顯示原始請求的傳送路徑。當 Stripe 將客戶重定向迴應用程式時,這將幫助你正確提供應用程式的成功和失敗頁面。

對於後端,建立一個 Dockerfile,為您的 Java 應用程式設定合適的環境。使用 Dockerfile 可以確保為 Java 應用程式提供的環境在所有主機(無論是本地開發主機還是 Kinsta 部署主機)上都是相同的,從而確保應用程式按預期執行。

為此,請在 backend 資料夾中建立一個名為 Dockerfile 的檔案,並在其中儲存以下內容:

Plain text
Copy to clipboard
Open code in new window
EnlighterJS 3 Syntax Highlighter
FROM openjdk:22-oraclelinux8
LABEL maintainer="krharsh17"
WORKDIR /app
COPY . /app
RUN ./mvnw clean package
EXPOSE 8080
ENTRYPOINT ["java", "-jar", "/app/target/backend.jar"]
FROM openjdk:22-oraclelinux8 LABEL maintainer="krharsh17" WORKDIR /app COPY . /app RUN ./mvnw clean package EXPOSE 8080 ENTRYPOINT ["java", "-jar", "/app/target/backend.jar"]
FROM openjdk:22-oraclelinux8
LABEL maintainer="krharsh17"
WORKDIR /app
COPY . /app
RUN ./mvnw clean package
EXPOSE 8080
ENTRYPOINT ["java", "-jar", "/app/target/backend.jar"]

該檔案指示執行時使用 OpenJDK Java 映像作為部署容器的基礎,執行 ./mvnw clean package 命令來構建應用程式的 JAR 檔案,並使用 java -jar <jar-file> 命令來執行該檔案。至此,原始碼部署到 Kinsta 的準備工作就完成了。

設定 GitHub 資源庫

要開始部署應用程式,請建立兩個 GitHub 倉庫來存放應用程式的原始碼。如果使用 GitHub CLI,可以通過終端執行以下命令來完成:

Plain text
Copy to clipboard
Open code in new window
EnlighterJS 3 Syntax Highlighter
# Run these in the backend folder
gh repo create stripe-payments-java-react-backend --public --source=. --remote=origin
git init
git add .
git commit -m "Initial commit"
git push origin main
# Run these in the frontend folder
gh repo create stripe-payments-java-react-frontend --public --source=. --remote=origin
git init
git add .
git commit -m "Initial commit"
git push origin main
# Run these in the backend folder gh repo create stripe-payments-java-react-backend --public --source=. --remote=origin git init git add . git commit -m "Initial commit" git push origin main # Run these in the frontend folder gh repo create stripe-payments-java-react-frontend --public --source=. --remote=origin git init git add . git commit -m "Initial commit" git push origin main
# Run these in the backend folder
gh repo create stripe-payments-java-react-backend --public --source=. --remote=origin
git init
git add .
git commit -m "Initial commit"
git push origin main
# Run these in the frontend folder
gh repo create stripe-payments-java-react-frontend --public --source=. --remote=origin
git init
git add .
git commit -m "Initial commit"
git push origin main

這將在你的賬戶中建立新的 GitHub 倉庫,並將你的應用程式程式碼推送到這些倉庫。您應該可以訪問前臺和後臺倉庫。接下來,按照以下步驟將這些倉庫部署到 Kinsta:

  1. MyKinsta 面板上登入或建立 Kinsta 帳戶。
  2. 在左側邊欄單擊 Applications ,然後單擊 Add Application
  3. 在出現的模態中,選擇要部署的版本庫。如果有多個分支,可以選擇所需的分支併為應用程式命名。
  4. 從 25 個選項的列表中選擇一個可用的資料中心位置。Kinsta 會自動檢測應用程式的啟動命令。

請記住,您需要為前臺和後臺應用程式提供一些環境變數,以便它們正常工作。前臺應用程式需要以下環境變數:

  • VITE_STRIPE_API_KEY
  • VITE_SERVER_BASE_URL
  • VITE_CLIENT_BASE_URL

要部署後端應用程式,請完全按照前端的方法操作,但在 Build environment 步驟中,請選擇 Use Dockerfile to set up container image 單選按鈕,並輸入 Dockerfile 作為後端應用程式的 Dockerfile 路徑。

設定構建環境細節

設定構建環境細節

記住新增後臺環境變數:

  • CLIENT_BASE_URL
  • STRIPE_API_KEY

部署完成後,前往應用程式的詳細資訊頁面,從那裡訪問部署的 URL。

部署在 Kinsta 上的應用程式的託管 URL

部署在 Kinsta 上的應用程式的託管 URL

前往 Stripe 面板,獲取金鑰和可釋出 API 金鑰。確保向前端應用程式提供 Stripe 可釋出金鑰(而不是祕鑰)。

此外,請確保您的基礎 URL 末尾沒有尾部正斜線 ( / )。路由已經有前導斜線,因此在基本 URL 末尾新增尾部斜線會導致最終 URL 中新增兩個斜線。

對於後臺應用程式,請新增 Stripe 面板上的金鑰(而不是可釋出金鑰)。此外,確保客戶端 URL 末尾沒有尾隨的正斜槓 ( / )。

新增變數後,轉到應用程式 “Deployments” 選項卡,點選後端應用程式的 redeploy 按鈕。這樣就完成了通過環境變數為 Kinsta 部署提供憑據所需的一次性設定。

接下來,您就可以將更改提交到版本控制中了。如果您在部署時勾選了選項,Kinsta 會自動重新部署您的應用程式;否則,您需要手動觸發重新部署。

小結

在本文中,您已經瞭解了 Stripe 的工作原理及其提供的支付流程。您還通過一個詳細示例瞭解瞭如何將 Stripe 整合到 Java 應用程式中,以接受一次性付款、設定訂閱、提供免費試用和生成付款發票。

將 Stripe 和 Java 結合使用,您就可以為客戶提供一個強大的支付解決方案,該解決方案可以很好地擴充套件並與您現有的應用程式和工具生態系統無縫整合。

評論留言